Laravel Rest Api Tester Package Tutorial

Step 1: Install laravel-api-tester Package

composer require asvae/laravel-api-tester

After successfully install package, you have to open config/app.php file and add service provider and alias.

config/app.php

'providers' => [

	....

	Asvae\ApiTester\ServiceProvider::class,

]

.....

You can publish the default configuration file by following command:

php artisan vendor:publish --provider="Asvae\ApiTester\ServiceProvider"

Step 2: Create API Route

Route::get('users',function(){	$users = \App\User::get();	return response()->json($users);});

Go This Link

http://localhost:8000/api-tester

Face Some Problem Work Some Step : Original link

here what i found after carefully reading core files of api-tester, and it works for me in laravel version > 5.8
you need to change some files in vendor\asvae\laravel-api-tester folder

Step 1:
first of all open vendor\asvae\laravel-api-tester\resources\views\api-tester.blade.php
and replace some code
From:
<link media="all" type="text/css" rel="stylesheet" href="{{ route('api-tester.file', ['file' => 'api-tester.css']) }}">
To:
<link media="all" type="text/css" rel="stylesheet" href="{{ route('api-tester.file', ['_file' => 'api-tester.css']) }}">

also need to do some more in same file:

From:
<script src="{{ route('api-tester.file', ['file' => 'api-tester.js']) }}"></script>
To:
<script src="{{ route('api-tester.file', ['_file' => 'api-tester.js']) }}"></script>

Step 2:
if you are not running your system on PHP v7.4 then skip the step 2
open vendor\asvae\laravel-api-tester\src\Storages folder and find JsonStorage.php
on line # 57 Replace the code

From:
$this->path = implode($path,'/');

To:
$this->path = implode('/',$path);

Step 3:

open vendor\asvae\laravel-api-tester\src\Entities folder and find RouteInfo.php
on line # 190 Replace the code

From:

if (is_string($uses) && str_contains($uses, '@')) {

To:
if (is_string($uses) && Str::contains($uses, '@')) {

also dont forget to add below line at top of the page
use Illuminate\Support\Str;
that's it Now enjoy with your output.

Laravel Tutorial List

CSS Snippet

Hero Section Link

Bootstrap Material Input :

<div class="row">
		<div class="col-md-3">
    	 <div class="pad15"><br>
                                <div class="md-input">
                                    <input class="md-form-control" required="" type="text">
                                    <span class="highlight"></span>
                                    <span class="bar"></span>
                                    <label>User Name</label>
                                </div>
                                <div class="md-input">
                                    <input class="md-form-control" required="" type="text">
                                    <span class="highlight"></span>
                                    <span class="bar"></span>
                                    <label>Password</label>
                                </div>
  
		</div>
    </div>


        <div class="col-md-3">
    	 <div class="pad15"><br>
                                <div class="md-input">
                                    <input class="md-form-control" required="" type="text">
                                    <span class="highlight"></span>
                                    <span class="bar"></span>
                                    <label>User Name</label>
                                </div>
                                <div class="md-input">
                                    <input class="md-form-control" required="" type="text">
                                    <span class="highlight"></span>
                                    <span class="bar"></span>
                                    <label>Password</label>
                                </div>
  
		</div>
    </div>
    
 
</div>   
.md-input {
    position: relative;
    margin-bottom: 30px;
}
    .md-input .md-form-control {
        font-size: 16px;
        padding: 10px 10px 10px 5px;
        display: block;
        border: none;
        border-bottom: 2px solid #CACACA;
        box-shadow: none;
        width: 100%;
    }

    .md-input label {
        color: rgba(0, 0, 0, 0.5);
        font-size: 16px;
        font-weight: normal;
        position: absolute;
        pointer-events: none;
        left: 5px;
        top: 10px;
        transition: 0.2s ease all;
        -moz-transition: 0.2s ease all;
        -webkit-transition: 0.2s ease all;
    }

    .md-input .bar:before {
        left: 50%;
    }

    .md-input .bar:after {
        right: 50%;
    }

    .md-input .highlight {
        position: absolute;
        height: 60%;
        width: 100px;
        top: 25%;
        left: 0;
        pointer-events: none;
        opacity: 0.5;
    }
    .md-input .md-form-control:focus ~ label, .md-input .md-form-control:valid ~ label {
    top: -15px;
    font-size: 14px;
    color: #183D5D;
}
.md-input .bar:before, .md-input .bar:after {
    content: '';
    height: 2px;
    width: 0;
    bottom: 0px;
    position: absolute;
    background: #03A9F4;
    transition: 0.2s ease all;
    -moz-transition: 0.2s ease all;
    -webkit-transition: 0.2s ease all;
}

.md-input .md-form-control:focus ~ .bar:before, .md-input .md-form-control:focus ~ .bar:after {
    width: 50%;
}

scrool load fade effect

$(window).on("load",function() {
  $(window).scroll(function() {
    var windowBottom = $(this).scrollTop() + $(this).innerHeight();
    $(".fade").each(function() {
      /* Check the location of each desired element */
      var objectBottom = $(this).offset().top + $(this).outerHeight();
      
      /* If the element is completely within bounds of the window, fade it in */
      if (objectBottom < windowBottom) { //object comes into view (scrolling down)
        if ($(this).css("opacity")==0) {$(this).fadeTo(500,1);}
      } else { //object goes out of view (scrolling up)
        if ($(this).css("opacity")==1) {$(this).fadeTo(500,0);}
      }
    });
  }).scroll(); //invoke scroll-handler on page-load
});
.fade {
  margin: 50px;
  padding: 50px;
  background-color: lightgreen;
  opacity: 1;
}
<script src="https://ajax.googleapis.com/ajax/libs/jquery/1.7.1/jquery.min.js"></script>

<div>
  <div class="fade">Fade In 01</div>
  <div class="fade">Fade In 02</div>
  <div class="fade">Fade In 03</div>
  <div class="fade">Fade In 04</div>
  <div class="fade">Fade In 05</div>
  <div class="fade">Fade In 06</div>
  <div class="fade">Fade In 07</div>
  <div class="fade">Fade In 08</div>
  <div class="fade">Fade In 09</div>
  <div class="fade">Fade In 10</div>
</div>

Bootstrap Admin Dashboard With Slide Menu

<link href="//maxcdn.bootstrapcdn.com/bootstrap/3.3.0/css/bootstrap.min.css" rel="stylesheet" id="bootstrap-css">
<script src="//maxcdn.bootstrapcdn.com/bootstrap/3.3.0/js/bootstrap.min.js"></script>
<script src="//code.jquery.com/jquery-1.11.1.min.js"></script>
<!------ Include the above in your HEAD tag ---------->

<div id="throbber" style="display:none; min-height:120px;"></div>
<div id="noty-holder"></div>
<div id="wrapper">
    <!-- Navigation -->
    <nav class="navbar navbar-inverse navbar-fixed-top" role="navigation">
        <!-- Brand and toggle get grouped for better mobile display -->
        <div class="navbar-header">
            <button type="button" class="navbar-toggle" data-toggle="collapse" data-target=".navbar-ex1-collapse">
                <span class="sr-only">Toggle navigation</span>
                <span class="icon-bar"></span>
                <span class="icon-bar"></span>
                <span class="icon-bar"></span>
            </button>
            <a class="navbar-brand" href="https://bryanrojasq.wordpress.com">
                <img src="http://placehold.it/200x50&text=LOGO" alt="LOGO">
            </a>
        </div>
        <!-- Top Menu Items -->
        <ul class="nav navbar-right top-nav">
            <li><a href="#" data-placement="bottom" data-toggle="tooltip" href="#" data-original-title="Stats"><i class="fa fa-bar-chart-o"></i>
                </a>
            </li>            
            <li class="dropdown">
                <a href="#" class="dropdown-toggle" data-toggle="dropdown">Admin User <b class="fa fa-angle-down"></b></a>
                <ul class="dropdown-menu">
                    <li><a href="#"><i class="fa fa-fw fa-user"></i> Edit Profile</a></li>
                    <li><a href="#"><i class="fa fa-fw fa-cog"></i> Change Password</a></li>
                    <li class="divider"></li>
                    <li><a href="#"><i class="fa fa-fw fa-power-off"></i> Logout</a></li>
                </ul>
            </li>
        </ul>
        <!-- Sidebar Menu Items - These collapse to the responsive navigation menu on small screens -->
        <div class="collapse navbar-collapse navbar-ex1-collapse">
            <ul class="nav navbar-nav side-nav">
                <li>
                    <a href="#" data-toggle="collapse" data-target="#submenu-1"><i class="fa fa-fw fa-search"></i> MENU 1 <i class="fa fa-fw fa-angle-down pull-right"></i></a>
                    <ul id="submenu-1" class="collapse">
                        <li><a href="#"><i class="fa fa-angle-double-right"></i> SUBMENU 1.1</a></li>
                        <li><a href="#"><i class="fa fa-angle-double-right"></i> SUBMENU 1.2</a></li>
                        <li><a href="#"><i class="fa fa-angle-double-right"></i> SUBMENU 1.3</a></li>
                    </ul>
                </li>
                <li>
                    <a href="#" data-toggle="collapse" data-target="#submenu-2"><i class="fa fa-fw fa-star"></i>  MENU 2 <i class="fa fa-fw fa-angle-down pull-right"></i></a>
                    <ul id="submenu-2" class="collapse">
                        <li><a href="#"><i class="fa fa-angle-double-right"></i> SUBMENU 2.1</a></li>
                        <li><a href="#"><i class="fa fa-angle-double-right"></i> SUBMENU 2.2</a></li>
                        <li><a href="#"><i class="fa fa-angle-double-right"></i> SUBMENU 2.3</a></li>
                    </ul>
                </li>
                <li>
                    <a href="investigaciones/favoritas"><i class="fa fa-fw fa-user-plus"></i>  MENU 3</a>
                </li>
                <li>
                    <a href="sugerencias"><i class="fa fa-fw fa-paper-plane-o"></i> MENU 4</a>
                </li>
                <li>
                    <a href="faq"><i class="fa fa-fw fa fa-question-circle"></i> MENU 5</a>
                </li>
            </ul>
        </div>
        <!-- /.navbar-collapse -->
    </nav>

    <div id="page-wrapper">
        <div class="container-fluid">
            <!-- Page Heading -->
            <div class="row" id="main" >
                <div class="col-sm-12 col-md-12 well" id="content">
                    <h1>Welcome Admin!</h1>
                </div>
            </div>
            <!-- /.row -->
        </div>
        <!-- /.container-fluid -->
    </div>
    <!-- /#page-wrapper -->
</div><!-- /#wrapper -->
@import url('https://maxcdn.bootstrapcdn.com/font-awesome/4.3.0/css/font-awesome.min.css');
@media(min-width:768px) {
    body {
        margin-top: 50px;
    }
    /*html, body, #wrapper, #page-wrapper {height: 100%; overflow: hidden;}*/
}

#wrapper {
    padding-left: 0;    
}

#page-wrapper {
    width: 100%;        
    padding: 0;
    background-color: #fff;
}

@media(min-width:768px) {
    #wrapper {
        padding-left: 225px;
    }

    #page-wrapper {
        padding: 22px 10px;
    }
}

/* Top Navigation */

.top-nav {
    padding: 0 15px;
}

.top-nav>li {
    display: inline-block;
    float: left;
}

.top-nav>li>a {
    padding-top: 20px;
    padding-bottom: 20px;
    line-height: 20px;
    color: #fff;
}

.top-nav>li>a:hover,
.top-nav>li>a:focus,
.top-nav>.open>a,
.top-nav>.open>a:hover,
.top-nav>.open>a:focus {
    color: #fff;
    background-color: #1a242f;
}

.top-nav>.open>.dropdown-menu {
    float: left;
    position: absolute;
    margin-top: 0;
    /*border: 1px solid rgba(0,0,0,.15);*/
    border-top-left-radius: 0;
    border-top-right-radius: 0;
    background-color: #fff;
    -webkit-box-shadow: 0 6px 12px rgba(0,0,0,.175);
    box-shadow: 0 6px 12px rgba(0,0,0,.175);
}

.top-nav>.open>.dropdown-menu>li>a {
    white-space: normal;
}

/* Side Navigation */

@media(min-width:768px) {
    .side-nav {
        position: fixed;
        top: 60px;
        left: 225px;
        width: 225px;
        margin-left: -225px;
        border: none;
        border-radius: 0;
        border-top: 1px rgba(0,0,0,.5) solid;
        overflow-y: auto;
        background-color: #222;
        /*background-color: #5A6B7D;*/
        bottom: 0;
        overflow-x: hidden;
        padding-bottom: 40px;
    }

    .side-nav>li>a {
        width: 225px;
        border-bottom: 1px rgba(0,0,0,.3) solid;
    }

    .side-nav li a:hover,
    .side-nav li a:focus {
        outline: none;
        background-color: #1a242f !important;
    }
}

.side-nav>li>ul {
    padding: 0;
    border-bottom: 1px rgba(0,0,0,.3) solid;
}

.side-nav>li>ul>li>a {
    display: block;
    padding: 10px 15px 10px 38px;
    text-decoration: none;
    /*color: #999;*/
    color: #fff;    
}

.side-nav>li>ul>li>a:hover {
    color: #fff;
}

.navbar .nav > li > a > .label {
  -webkit-border-radius: 50%;
  -moz-border-radius: 50%;
  border-radius: 50%;
  position: absolute;
  top: 14px;
  right: 6px;
  font-size: 10px;
  font-weight: normal;
  min-width: 15px;
  min-height: 15px;
  line-height: 1.0em;
  text-align: center;
  padding: 2px;
}

.navbar .nav > li > a:hover > .label {
  top: 10px;
}

.navbar-brand {
    padding: 5px 15px;
}
$(function(){
    $('[data-toggle="tooltip"]').tooltip();
    $(".side-nav .collapse").on("hide.bs.collapse", function() {                   
        $(this).prev().find(".fa").eq(1).removeClass("fa-angle-right").addClass("fa-angle-down");
    });
    $('.side-nav .collapse').on("show.bs.collapse", function() {                        
        $(this).prev().find(".fa").eq(1).removeClass("fa-angle-down").addClass("fa-angle-right");        
    });
})    
    

Laravel Solution

Create Laravel Project

composer create-project --prefer-dist laravel/laravel Projectname

Database Connection : Open .enf File And Edit

DB_CONNECTION=mysql 
 DB_HOST=127.0.0.1 
 DB_PORT=3306 
 DB_DATABASE=here your database name here
 DB_USERNAME=here database username here
 DB_PASSWORD=here database password here

Create Migration File : open Cmd In Project Folder And Run Script

php artisan make:migration migrationfilename

Create Database Table And Column With Migration File : open migration File And edit with tablename

public function up()
 {
     Schema::create('tablename', function (Blueprint $table) {
         $table->increments('id');
         $table->string('name')->nullable();
         $table->string('email')->nullable();
         $table->timestamps();
     });
 }

Migration Comand:

php artisan migrate

Migration Rules :

<?php

use Illuminate\Database\Migrations\Migration;
use Illuminate\Database\Schema\Blueprint;
use Illuminate\Support\Facades\Schema;

class CreateOITMSTable extends Migration
{
    /**
     * Run the migrations.
     *
     * @return void
     */
    public function up()
    {
        Schema::create('o_i_t_m_s', function (Blueprint $table) {
            $table->id();
            $table->engine = 'InnoDB';
            $table->boolean('is_publish')->default(0);
            $table->charset = 'utf8mb4';
            $table->string('ItemCode',50)->comment('Item No.');
            $table->string('CodeBars',254)->comment('Bar Code');
            $table->mediumText('ItemName',100)->comment('Item Description');
            $table->string('FrgnName',100)->comment('Foreign Name')->nullable();
            $table->bigInteger('ItmsGrpCod',6)->comment('Item Group');
            $table->string('ItemType',50)->comment('Item Type');
            $table->char('VATLiable',1)->comment('Tax Liable');
            $table->date('created_date')->comment('Created Date');
            $table->dateTime('created_time', 10)->comment('Created Time');
            $table->decimal('unit_price', 8, 2)->comment('Unit Price');
            $table->enum('status', ['Pending', 'Wait', 'Active'])->default('Pending');
            $table->longText('remarks')->comment('Item Remarks')->default("");
            $table->smallInteger('qty',12)->comment('Quantity');
            $table->macAddress('device')->comment('Device Macaddress');
            $table->timestamps();
        });
    }

    /**
     * Reverse the migrations.
     *
     * @return void
     */
    public function down()
    {
        Schema::dropIfExists('o_i_t_m_s');
    }
}

Solve Migration Error for Default String Length :app/providers/AppServiceProvider.php and put the below code :

use Illuminate\Support\Facades\Schema;
 

function boot()
{
    Schema::defaultStringLength(191);
}

Create Resource Route : Include In Route/Web.php

Route::resource('ajax-crud', 'AjaxController');

Make Controller: Open Cmd In Project Folder And Run Script

php artisan make:controller ControllerName --resource 

Laravel start development Server with ip and port :

php artisan serve --host 192.168.1.101 --port 80

Store Data

  public function store(Request $request)
    {
        //
        $validatedData = $request->validate([
            'name'=>'required|max:255',
            'roll'=>'required',
            'class'=>'required'
        ]);
        $show = Student::create($validatedData);
        return redirect('/student')->with('successs','Student Added');
    }

Get Data And View Data

Get All Data :

   public function index()
    {
        //
 
        $data = Student::all();
        return view('student.index',compact('data'));
    }
 

Get All Data And View with Paginate By Controller And View :

    public function index()
    {
        $data['users'] = User::orderBy('id','desc')->paginate(8);
   
        return view('ajax-crud',$data);
    }
    <table class="table table-bordered" id="laravel_crud">
           <thead>
              <tr>
                 <th>Id</th>
                 <th>Name</th>
                 <th>Email</th>
                 <td colspan="2">Action</td>
              </tr>
           </thead>
           <tbody id="users-crud">
              @foreach($users as $u_info)
              <tr id="user_id_{{ $u_info->id }}">
                 <td>{{ $u_info->id  }}</td>
                 <td>{{ $u_info->name }}</td>
                 <td>{{ $u_info->email }}</td>
                 <td colspan="2">
                    <a href="javascript:void(0)" id="edit-user" data-id="{{ $u_info->id }}" class="btn btn-info mr-2">Edit</a>
                    <a href="javascript:void(0)" id="delete-user" data-id="{{ $u_info->id }}" class="btn btn-danger delete-user">Delete</a>
                  </td>
              </tr>
              @endforeach
           </tbody>
          </table>
          {{ $users->links() }}

Find With Coloumn Name :

  public function edit($id)
    {   
        $where = array('id' => $id);
        $user  = User::where($where)->first();
 
        return Response::json($user);
    }
 

Another Way :

 public function edit($id)
    {
        //
        $studentedit = Student::findOrFail($id);
        return view('student.edit')->with('data',$studentedit);
    }

Multiple Json Array Controller

return Response::json(array(
    'item_image' => $item_image,
    'item_something' => $item_something,
    'item_more' => $item_more,
));

Jquery Ajax With Laravel :

Ajax csrf tocken Handle :

   // ADD HEAD SECTION 
 <meta name="csrf-token" content="{{ csrf_token() }}">
$.ajaxSetup({
        headers: {
            'X-CSRF-TOKEN': $('meta[name="csrf-token"]').attr('content')
        }
    });

Add bootstrap Flash Message

  • Adding Bootstrap css And Jquery.js
  • return Session Message In Controller
 return redirect('employee')->with('success', 'Data Added successfully.');

Print Session Message In View

  <!-- For Flash Meaasge -->
    <div id="message">
        <div style="padding: 5px;">
            @if ($message = Session::get('success'))
            <div class="alert alert-success alert-block sticky-top alert alert-dismissible ">
                <button type="button" class="close" data-dismiss="alert">×</button>	
                    <strong>{{ $message }}</strong>
            </div>
            @endif
            
            
            @if ($message = Session::get('error'))
            <div class="alert alert-danger alert-block sticky-top alert alert-dismissible">
                <button type="button" class="close" data-dismiss="alert">×</button>	
                    <strong>{{ $message }}</strong>
            </div>
            @endif
            
            
            @if ($message = Session::get('warning'))
            <div class="alert alert-warning alert-block sticky-top alert alert-dismissible">
                <button type="button" class="close" data-dismiss="alert">×</button>	
                <strong>{{ $message }}</strong>
            </div>
            @endif
            
            
            @if ($message = Session::get('info'))
            <div class="alert alert-info alert-block sticky-top alert alert-dismissible">
                <button type="button" class="close" data-dismiss="alert">×</button>	
                <strong>{{ $message }}</strong>
            </div>
            @endif
            
            
            @if ($errors->any())
            <div class="alert alert-danger sticky-top alert alert-dismissible">
                <button type="button" class="close" data-dismiss="alert">×</button>	
                Please check the form below for errors
            </div>
            @endif
        </div>
    </div>


  <!-- For Flash Meaasge End -->

Route With Link

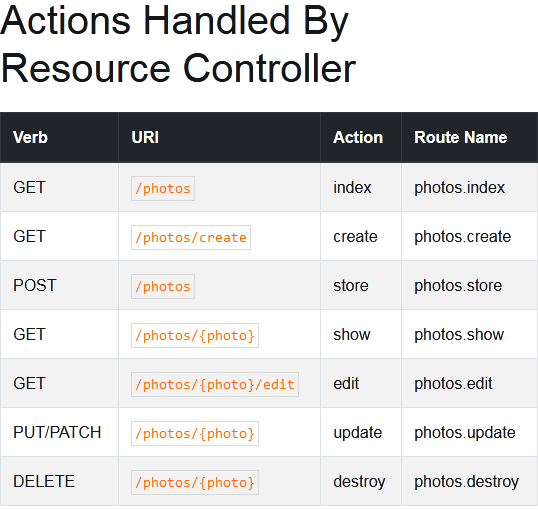
In addition to @chanafdo answer, you can use route name

when working with laravel blade

<a href="{{route('login')}}">login here</a>
with parameter in route name

when go to url like URI: profile/{id} 
<a href="{{route('profile', ['id' => 1])}}">login here</a>

without blade

<a href="<?php echo route('login')?>">login here</a>

with parameter in route name

when go to url like URI: profile/{id} 
<a href="<?php echo route('profile', ['id' => 1])?>">login here</a>

Session Set And Get

 // controller file        
Session::put('success', $validate);
// view file
{{ Session::get('success') }}

Laravel Searching Eloquent models

    $data =   Student::query()
        ->where('name', 'LIKE', "%{$id}%") 
        ->orWhere('roll', 'LIKE', "%{$id}%") 
        ->get();

   return Response::json($data);

Integrated Admin Lte Te

follow Link

একটা একটা করে কম্পোজার স্ক্রিপ্ট রান করি

composer require jeroennoten/laravel-adminlte

composer require laravel/ui

php artisan ui:controllers
php artisan adminlte:install
composer update jeroennoten/laravel-adminlte
php artisan adminlte:update
php artisan adminlte:install --only=main_views

এবার resources/views/vendor/adminlte ফোল্ডার দেখতে পাবো

home.blade টেম্পলেট ফাইল এডিট করি

{{-- resources/views/admin/dashboard.blade.php --}}

@extends('adminlte::page')

@section('title', 'Dashboard')

@section('content_header')
    <h1>Dashboard</h1>
@stop

@section('content')
    <p>Welcome to this beautiful admin panel.</p>
@stop

@section('css')
    <link rel="stylesheet" href="/css/admin_custom.css">
@stop

@section('js')
    <script> console.log('Hi!'); </script>
@stop

Change Menu Item : Open projectfolder/config/adminlte.php and Edit

হোম পেজ এ গেলে লগইন পেজ শো করানো : copy C:\xampp\htdocs\laravel8\resources\views\vendor\adminlte\auth\login.blade.php

and past

welcome.blade.php

Change Laravel Public Dorectory :

FOLLOW LINK

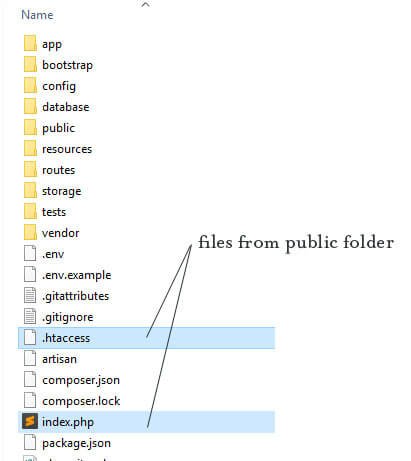
  • cut index.php and httaccs file and past in project root directory

Open index.php and replace 

require __DIR__.'/../vendor/autoload.php';
 TO 
require __DIR__.'/vendor/autoload.php';

$app = require_once __DIR__.'/../bootstrap/app.php';
TO 
$app = require_once __DIR__.'/bootstrap/app.php';

Save and close the file. Go to your browser and reload your page. Now, you should see the Laravel’s welcome page.

লারাভেল এ ভিউ ডিজাইন এ দরকারি ফানঃশন :

<!-- CSRF Token -->
    <meta name="csrf-token" content="{{ csrf_token() }}">

<!-- Get App Name And Show 
set config/app.php
'name' => 'Laravel',
And also inside .env file
APP_NAME=your_app_name

<title>Invoice - {{ config('app.name', 'Inventory Management System') }}</title>

// Show Date with Formate 
Date: {{ date('l, d-M-Y h:i:s A') }}

//Show Price With Format
{{ number_format($content->price, 2) }}


Zkteco Time Attendance System With Zkteco Machine

প্রথমে zkteco অ্যাটেনডেন্স মেশিন কে ইন্টারনেট ক্যাবল দ্বারা কানেক্ট করতে হবে। মেশিন এর মধ্যে আইপি ঠিক করার পর আইপি টি পরবর্তীতে সফটওয়্যার এর সাথে কানেক্ট করার জন্য দরকার হবে।
১. zkteco attendance management সফটওয়্যার কম্পিউটার এ সাধারণ নিয়মে ইনস্টল করতে হবে।
২. সফটওয়্যার ওপেন করে ডিভাইস অ্যাড করে কনফিগার করে কানেক্ট করতে হবে।

কিভাবে মেশিন হতে অ্যাটেনডেন্স ডাটা আনবো : সফটওয়্যার ওপেন করে বামপাশের মেনু হতে download attendance log ক্লিক করলে মেশিন এর অ্যাটেনডেন্স ইন আউট ডাটা মেশিন হতে সফটওয়্যার এ চলে আসবে।

কিভাবে মেশিন হতে ইউজার ডাটা আনবো :সফটওয়্যার ওপেন করে বামপাশের মেনু হতে download userinfo and Fp ক্লিক করলে মেশিন এর ইউজার ডাটা মেশিন হতে সফটওয়্যার এ চলে আসবে।

কিভাবে মেশিন এ ম্যানুয়ালি ইউজার এর নাম ও অন্য তথ্য আপডেট করবো : সফটওয়্যার ওপেন করে উপরের employee ক্লিক করে ইউজার সিলেক্ট করে ডাটা এডিট করে সেভ বাটনে ক্লিক করতে হবে।

আপডেটকৃত ইউজার ইনফরমেশন সফটওয়্যার হতে মেশিন এ পাঠানো : সফটওয়্যার এ ইউজার ইনফরমেশন আপডেট করার পর বামপাশের মেনু হতে upload userinfo and fp ক্লিক করে ইউজার সব বা ইচ্ছামতো সিলেক্ট করে আপলোড বাটনে এ ক্লিক করলে সফটওয়্যার হতে মেশিন এ ডাটা চলে যাবে।

সফটওয়্যার এ ডিপার্টমেন্ট অ্যাড করা : বামপাশের মেনু হতে department list ক্লিক করে অ্যাড বাটনে এ ক্লিক করে ডিপার্টমেন্ট অ্যাড করতে হবে।

সফটওয়্যার এ ইউজারদের বিভিন্ন ডিপার্টমেন্ট এ অ্যাড করা : প্রথমে সফটওয়্যার ওপেন করে employee মেনু ক্লিক করে ইউজার সিলেক্ট করে transfer এমপ্লয়ী ক্লিক করে ডিপার্টমেন্ট সিলেক্ট করে ওকে করলে employee ডিপার্টমেন্ট এ ট্রান্সফার হয়ে যাবে

সফটওয়্যার এর মাদ্ধমে shift ম্যানেজমেন্ট করা : প্রথমে আমাদের Maintenence Time Table এ ক্লিক করে আমাদের শিফট তৈরী করতে হবে। এবার shift management এ ক্লিক করে শিফট এর নাম তৈরী করে অ্যাড বাটনে ক্লিক করে আগের বানানো timetable সিলেক্ট করে শিফট বানাতে হবে।

Employee কে শিফট এর অন্তর্ভুক্ত করা : Employee Schedule এ ক্লিক করে এমপ্লয়ী সিলেক্ট করে নিচের time রেঞ্জ সিলেক্ট করে উপরের arrange শিফট এ ক্লিক করে + বা – বাটনে ক্লিক করে শিফট অ্যাড বা কেটে ওকে করলে শিফট এপলাই হয়ে যাবে।

কিভাবে holiday লিস্ট অ্যাড বা মাইনাস করবো : প্রথমে উপরের maintanence অপসন হতে leave class এ ক্লিক করে হলিডে লিস্ট যেমন মে ডে ,ঈদ হলিডে ,Sick লিভ , ক্যাজুয়াল Leave ইত্যাদি যোগ বা বিয়োগ করবো।

কিভাবে Employee দের সফটওয়্যার এ ছুটি দেব : attendance মেনু হতে Employee leaving on business এ ক্লিক করে employee সিলেক্ট করে add বাটনে ক্লিক ডেট রেঞ্জ সিলেক্ট করে ওকে করলে ছুটি প্রযোজ্য হবে ।

কিভাবে Employee দের কাটানো ছুটি সফটওয়্যার এ দেখবো : attendance মেনু হতে Employee leaving on business এ ক্লিক করে employee সিলেক্ট করে ডেট রেঞ্জ সিলেক্ট করে query বাটনে ক্লিক করলে ছুটি দেখাবে।

কিভাবে এমপ্লয়ী দের ম্যানুয়ালি ইন আউট ঠিক করবো : সফটওয়্যার ওপেন করে attendance->forgoten to in out এ ক্লিক করে employee সিলেক্ট করে state এ in ও আউট সিলেক্ট করে ডেট ও টাইম select করে add ক্লিক করলে ডাটা ইন ও আউট ঠিক হয়ে যাবে।

Laravel Multiple Input Array Crud

Another Tutorials LINK

Index.blade.php

<!DOCTYPE html>
<html lang="en">
<head>
    <meta charset="UTF-8">
    <meta name="viewport" content="width=device-width, initial-scale=1.0">
    <title>Document</title>
    <link href="https://fonts.googleapis.com/css?family=Nunito:200,600" rel="stylesheet">
    <link rel="stylesheet" href="https://maxcdn.bootstrapcdn.com/bootstrap/3.4.1/css/bootstrap.min.css">    <link rel="stylesheet" href="https://stackpath.bootstrapcdn.com/font-awesome/4.7.0/css/font-awesome.min.css">
<style>

</style>
</head>
<body>
    <form action="/salesorder" method="post">
        @csrf
    

<div class="container">
    <div class="panel panel-default" style="background-color: #CCC">
        <div class="panel-body">
                <div class="col-sm-6"> <!-- FIRST COLUMN -->
            <!--------------------------------- Customer Code -------------------------------------------->
            <div class="form-group">
                <label for="" class="col-sm-4 control-label">Customer</label>
                <div class="col-sm-8">
                <input type="text" class="form-control" id="" name="CardCode"  placeholder="">
                </div>
            </div>
    
            <!--------------------------------- Customer Name -------------------------------------------->
            <div class="form-group">
                <label for="" class="col-sm-4 control-label"> Name</label>
                <div class="col-sm-8">
                <input type="text" class="form-control" id="" name="CardName" placeholder="">
                </div>
            </div>
            
                </div>
                <div class="col-sm-6"> <!-- Second COLUMN -->
                    <div class="form-group">
                        <label for="" class="col-sm-4 control-label"> Contact Person</label>
                        <div class="col-sm-8">
                        <input type="text" class="form-control" id="" name="CntctCode" placeholder="">
                        </div>
                    </div>

                    <div class="form-group">
                        <label for="" class="col-sm-4 control-label"> Pi No</label>
                        <div class="col-sm-8">
                        <input type="text" class="form-control" id="" name="NumAtCard" placeholder="">
                        </div>
                    </div>
                </div>

                <div class="col-sm-6"> <!-- Third COLUMN -->
                    <div class="form-group">
                        <label for="" class="col-sm-4 control-label"> Currency</label>
                        <div class="col-sm-8">
                        <input type="text" class="form-control" id="" name="DocCur" placeholder="">

                    </div>
                    </div>

                    <div class="form-group">
                        <label for="" class="col-sm-4 control-label">Series </label>
                        <div class="col-sm-8">
                        <input type="text" class="form-control" id="" name="Series" placeholder="">
                        </div>
                    </div>
                </div>

                <div class="col-sm-6"> <!-- Four COLUMN -->
                    <div class="form-group">
                        <label for="" class="col-sm-4 control-label"> So </label>
                        <div class="col-sm-8">
                        <input type="text" class="form-control" id="" name="DocNum" placeholder="">

                    </div>
                    </div>

                    <div class="form-group">
                        <label for="" class="col-sm-4 control-label">Date </label>
                        <div class="col-sm-8">
                        <input type="text" class="form-control" id="" name="DocDueDate" placeholder="">
                        </div>
                    </div>
                </div>

                <div class="col-sm-6"> <!-- Five COLUMN -->
                    <div class="form-group">
                        <label for="" class="col-sm-4 control-label"> Delivery Date </label>
                        <div class="col-sm-8">
                        <input type="text" class="form-control" id="" name="TaxDate" placeholder="">

                    </div>
                    </div>

                    <div class="form-group">
                        <label for="" class="col-sm-4 control-label">Marketing </label>
                        <div class="col-sm-8">
                        <input type="text" class="form-control" id="" name="SlpCode" placeholder="">
                        </div>
                    </div>
                </div>

                <div class="col-sm-6"> <!-- Six COLUMN -->
                    <div class="form-group">
                        <label for="" class="col-sm-4 control-label"> Usd Rate </label>
                        <div class="col-sm-8">
                        <input type="text" class="form-control" id="" name="DocRate" placeholder="">

                    </div>
                    </div>

                    <div class="form-group">
                        <label for="" class="col-sm-4 control-label">Owner </label>
                        <div class="col-sm-8">
                        <input type="text" class="form-control" id="" name="Owner" placeholder="">
                        </div>
                    </div>
                </div>
        </div>
    </div><!-- END PANEL -->
</div>


<h1>Sales Order</h1>


            <table class="table table-light " id="myTable">
                <thead class="thead-light">
                    <tr>
                        <th>#</th>
                        <th>Item No</th>
                        <th>Qty</th>
                    </tr>
                </thead>
                <tbody>
                    <tr>
                        <td></td>
                        <td><input type="text" name="itemno[]" id=""></td>
                        <td><input type="text" name="Quantity[]" id=""></td>
                        <td><input type="text" name="Amount[]" id=""></td>
                        <td><input type="text" name="Color[]" id=""></td>
                        <td><input type="text" name="Style[]" id=""></td>
                        <td><input type="text" name="ItemRef[]" id=""></td>
                    </tr>
                </tbody>
                <tfoot>
                    <tr>
                        <th>#</th>
                    </tr>
                </tfoot>
            </table>
     
    
        <button class="btn-primary">Save</button>
        </form>
    </div>
</body>
<script>

</script>
</html>

SalesController.php

<?php

namespace App\Http\Controllers;

use App\SalesOrder;
use App\SalesItem;
use Illuminate\Http\Request;

class SalesOrderController extends Controller
{
    /**
     * Display a listing of the resource.
     *
     * @return \Illuminate\Http\Response
     */
    public function index()
    {
        //
    }

    /**
     * Show the form for creating a new resource.
     *
     * @return \Illuminate\Http\Response
     */
    public function create()
    {
        //
    }

    /**
     * Store a newly created resource in storage.
     *
     * @param  \Illuminate\Http\Request  $request
     * @return \Illuminate\Http\Response
     */
    public function store(Request $request)
    {
        //

        $sales = new SalesOrder();
        $sales->CardCode = $request->CardCode;
        $sales->CardName = $request->CardName;
        $sales->CntctCode = $request->CntctCode;
        $sales->NumAtCard = $request->NumAtCard;
        $sales->DocCur = $request->DocCur;
        $sales->DocRate = $request->DocRate;
        $sales->Series = $request->Series;
        $sales->DocNum = $request->DocNum;
        $sales->DocDueDate = $request->DocDueDate;
        $sales->TaxDate = $request->TaxDate;
        $sales->SlpCode = $request->SlpCode;
        $sales->Owner = $request->Owner;
        $id = $sales->save();

        foreach ($request->itemno as $key => $val){
            $data = array("ItemCode"=>$request->itemno[$key],"Quantity"=>$request->Quantity[$key],"Amount"=>$request->Amount[$key],"Color"=>$request->Color[$key],"Style"=>$request->Style[$key],"ItemRef"=>$request->ItemRef[$key]);
            SalesItem::insert( $data);
        }


    }

    /**
     * Display the specified resource.
     *
     * @param  \App\SalesOrder  $salesOrder
     * @return \Illuminate\Http\Response
     */
    public function show(SalesOrder $salesOrder)
    {
        //
    }

    /**
     * Show the form for editing the specified resource.
     *
     * @param  \App\SalesOrder  $salesOrder
     * @return \Illuminate\Http\Response
     */
    public function edit(SalesOrder $salesOrder)
    {
        //
    }

    /**
     * Update the specified resource in storage.
     *
     * @param  \Illuminate\Http\Request  $request
     * @param  \App\SalesOrder  $salesOrder
     * @return \Illuminate\Http\Response
     */
    public function update(Request $request, SalesOrder $salesOrder)
    {
        //
    }

    /**
     * Remove the specified resource from storage.
     *
     * @param  \App\SalesOrder  $salesOrder
     * @return \Illuminate\Http\Response
     */
    public function destroy(SalesOrder $salesOrder)
    {
        //
    }
}

SalesItemController.php

<?php

namespace App\Http\Controllers;

use App\SalesItem;
use Illuminate\Http\Request;

class SalesItemController extends Controller
{
    /**
     * Display a listing of the resource.
     *
     * @return \Illuminate\Http\Response
     */
    public function index()
    {
        //
    }

    /**
     * Show the form for creating a new resource.
     *
     * @return \Illuminate\Http\Response
     */
    public function create()
    {
        //
    }

    /**
     * Store a newly created resource in storage.
     *
     * @param  \Illuminate\Http\Request  $request
     * @return \Illuminate\Http\Response
     */
    public function store(Request $request)
    {
        //
    }

    /**
     * Display the specified resource.
     *
     * @param  \App\SalesItem  $salesItem
     * @return \Illuminate\Http\Response
     */
    public function show(SalesItem $salesItem)
    {
        //
    }

    /**
     * Show the form for editing the specified resource.
     *
     * @param  \App\SalesItem  $salesItem
     * @return \Illuminate\Http\Response
     */
    public function edit(SalesItem $salesItem)
    {
        //
    }

    /**
     * Update the specified resource in storage.
     *
     * @param  \Illuminate\Http\Request  $request
     * @param  \App\SalesItem  $salesItem
     * @return \Illuminate\Http\Response
     */
    public function update(Request $request, SalesItem $salesItem)
    {
        //
    }

    /**
     * Remove the specified resource from storage.
     *
     * @param  \App\SalesItem  $salesItem
     * @return \Illuminate\Http\Response
     */
    public function destroy(SalesItem $salesItem)
    {
        //
    }
}

SalesOrderController

<?php

namespace App\Http\Controllers;

use App\SalesOrder;
use App\SalesItem;
use Illuminate\Http\Request;

class SalesOrderController extends Controller
{
    /**
     * Display a listing of the resource.
     *
     * @return \Illuminate\Http\Response
     */
    public function index()
    {
        //
    }

    /**
     * Show the form for creating a new resource.
     *
     * @return \Illuminate\Http\Response
     */
    public function create()
    {
        //
    }

    /**
     * Store a newly created resource in storage.
     *
     * @param  \Illuminate\Http\Request  $request
     * @return \Illuminate\Http\Response
     */
    public function store(Request $request)
    {
        //

        $sales = new SalesOrder();
        $sales->CardCode = $request->CardCode;
        $sales->CardName = $request->CardName;
        $sales->CntctCode = $request->CntctCode;
        $sales->NumAtCard = $request->NumAtCard;
        $sales->DocCur = $request->DocCur;
        $sales->DocRate = $request->DocRate;
        $sales->Series = $request->Series;
        $sales->DocNum = $request->DocNum;
        $sales->DocDueDate = $request->DocDueDate;
        $sales->TaxDate = $request->TaxDate;
        $sales->SlpCode = $request->SlpCode;
        $sales->Owner = $request->Owner;
        $id = $sales->save();

        foreach ($request->itemno as $key => $val){
            $data = array("ItemCode"=>$request->itemno[$key],"Quantity"=>$request->Quantity[$key],"Amount"=>$request->Amount[$key],"Color"=>$request->Color[$key],"Style"=>$request->Style[$key],"ItemRef"=>$request->ItemRef[$key]);
            SalesItem::insert( $data);
        }


    }

    /**
     * Display the specified resource.
     *
     * @param  \App\SalesOrder  $salesOrder
     * @return \Illuminate\Http\Response
     */
    public function show(SalesOrder $salesOrder)
    {
        //
    }

    /**
     * Show the form for editing the specified resource.
     *
     * @param  \App\SalesOrder  $salesOrder
     * @return \Illuminate\Http\Response
     */
    public function edit(SalesOrder $salesOrder)
    {
        //
    }

    /**
     * Update the specified resource in storage.
     *
     * @param  \Illuminate\Http\Request  $request
     * @param  \App\SalesOrder  $salesOrder
     * @return \Illuminate\Http\Response
     */
    public function update(Request $request, SalesOrder $salesOrder)
    {
        //
    }

    /**
     * Remove the specified resource from storage.
     *
     * @param  \App\SalesOrder  $salesOrder
     * @return \Illuminate\Http\Response
     */
    public function destroy(SalesOrder $salesOrder)
    {
        //
    }
}

SalesOrder Migration File

<?php

use Illuminate\Database\Migrations\Migration;
use Illuminate\Database\Schema\Blueprint;
use Illuminate\Support\Facades\Schema;

class CreateSalesOrdersTable extends Migration
{
    /**
     * Run the migrations.
     *
     * @return void
     */
    public function up()
    {
        Schema::create('sales_orders', function (Blueprint $table) {
            $table->id();
            $table->string('CardCode');
            $table->string('CardName');
            $table->string('CntctCode');
            $table->string('NumAtCard');
            $table->string('DocCur');
            $table->string('DocRate');
            $table->string('Series');
            $table->string('DocNum');
            $table->date('DocDueDate');
            $table->date('TaxDate');
            $table->timestamps();
            $table->string('SlpCode');
            $table->string('Owner');
        });
    }

    /**
     * Reverse the migrations.
     *
     * @return void
     */
    public function down()
    {
        Schema::dropIfExists('sales_orders');
    }
}

SalesItem Migration File

<?php

use Illuminate\Database\Migrations\Migration;
use Illuminate\Database\Schema\Blueprint;
use Illuminate\Support\Facades\Schema;

class CreateSalesItemsTable extends Migration
{
    /**
     * Run the migrations.
     *
     * @return void
     */
    public function up()
    {
        Schema::create('sales_items', function (Blueprint $table) {
            $table->id();
            $table->string('ItemCode');
            $table->string('Quantity');
            $table->string('Amount');
            $table->string('Color');
            $table->string('Style');
            $table->string('ItemRef');
            $table->timestamps();
        });
    }

    /**
     * Reverse the migrations.
     *
     * @return void
     */
    public function down()
    {
        Schema::dropIfExists('sales_items');
    }
}

SalesItem Model

<?php

namespace App;

use Illuminate\Database\Eloquent\Model;

class SalesItem extends Model
{
    //
    protected $table = "sales_items";
    protected $fillable = ['ItemCode','Quantity','Amount','Color','Style','ItemRef'];
}

SalesOrder model

<?php

namespace App;

use Illuminate\Database\Eloquent\Model;

class SalesOrder extends Model
{
    //
    protected $table = "sales_orders";
    protected $fillable = ['CardCode','CardName','CntctCode','NumAtCard','DocCur','DocRate','Series','DocNum','DocDueDate','TaxDate','SlpCode','Owner'];
}

লারাভেল এ reactjs নিয়ে কাজ করা

লারাভেল এ reactjs নিয়ে কাজ করা :

Download Laravel7 & laravel7react boilarpalte

reactjs এর অনলাইন টুল :অনেক সময় html কোডেকে reactjs এর jsx এ কনভার্ট করার দরকার হয় আবার css কে react এ ভ্যালিড ভাবে লিখার জন্য ঝামেলায় পড়তে হয় তখন আমরা নিচের টুল গুলো ব্যবহার করবো। htmltojsx এন্ড css to reactjs

ভিজ্যুয়াল ষ্টুডিও কোড এ তাড়াতাড়ি reactjs কোড লিখার জন্য আমরা reactjs স্নিপেট এক্সটেনশনটি ইনস্টল করবো তাহলে যদি কোনো ক্লাস তৈরী করতে চাই তবে rcc লিখলে সম্পূর্ণ একটি ক্লাস তৈরী হয়ে যাবে আর ফাঙ্কশন লিখতে চাইলে rrc লিখলে সম্পূর্ণ একটি ফাঙ্কশন তৈরী হয়ে যাবে।

  • ১.প্রথমে php ৭.২ ভার্সন এর ইনভেরনমেন্ট তৈরী করতে হবে। এজন্য আমরা Xamp,Wamp ,Uwamp ,Usbwebserver বা অন্য যেকোনো উপায়ে আমাদের সিস্টেম এ php কোড রান করার পরিবেশ তৈরী করতে পারি।
  • ২.Composer ইনস্টল করতে হবে এবং ইনস্টল করার সময় অবশ্যই ইন্টারনেট কানেকশন লাগবে এবং php.exe ফাইলটি ইনস্টল এর সময় দেখিয়ে দিতে হবে।
  • ৩.Nodejs এর রেকোমেন্ডেড ভার্সন ইনস্টল করতে হবে
  • ৪.লারাভেল এ একটি প্রজেক্ট তৈরী করতে হবে এজন্য cli বা comand prump এ এই কোড টি রান করতে হবে : composer create-project –prefer-dist laravel/laravel projectname এবং ইন্টারনেট সংযোগ সহকারে কিছুক্ষন অপেক্ষা করতে হবে যতক্ষণ পর্যন্ত লারাভেল এ প্রজেক্ট তৈরী কমপ্লিট হয়। প্রজেক্ট তৈরী কমপ্লিট হলে সবুজ কালারে successfull লিখা আসবে।
  • ৫.লারাভেল ৭ এ reactjs নিয়ে কাজ করার জন্য প্রথমে এই কোড প্রজেক্ট ফোল্ডার এ কম্যান্ড পরাম্প এর মাদ্ধমে রান করতে হবে : composer require laravel/ui এবং ইন্টারনেট সংযোগ সহকারে কিছুক্ষন অপেক্ষা করতে হবে যতক্ষণ পর্যন্ত কমপ্লিট না হয়।
  • ৬.এবার এই কোড টি কমান্ড প্রৌম্প এর রান করতে হবে :php artisan ui react এবং ইন্টারনেট সংযোগ সহকারে কিছুক্ষন অপেক্ষা করতে হবে যতক্ষণ পর্যন্ত কমপ্লিট না হয়।
  • ৭.এবার এই কোড টি কমান্ড প্রৌম্প এর রান করতে হবে :npm install এবং ইন্টারনেট সংযোগ সহকারে কিছুক্ষন অপেক্ষা করতে হবে যতক্ষণ পর্যন্ত কমপ্লিট না হয়।
  • ৮.এবার এই কোড টি কমান্ড প্রৌম্প এর রান করতে হবে :npm run devএবং ইন্টারনেট সংযোগ সহকারে কিছুক্ষন অপেক্ষা করতে হবে যতক্ষণ পর্যন্ত কমপ্লিট না হয়।
  • ৯.এবার এই কোড টি কমান্ড প্রৌম্প এর রান করতে হবে : php artisan serve
  • ১০.এবার ব্রাউজার এ http://127.0.0.1:8000/ এই লিংক টি তে গেলে আমরা আমাদের লারাভেল প্রজেক্টটি দেখতে পাবো

১১.আমরা এবার এই ভিউ কে REACT দ্বারা পরিবর্তন করবো এজন্য resources/js/components/ ফোল্ডার এর মধ্যে index.js নাম এ একটি ফাইল তৈরী করবো।
১২. resources/js/components/ ফোল্ডার এর Example.js ফাইল এর সব কপি করে index.js ফাইল এ পেস্ট করে কিছু পরিবর্তন করবো।
১৩. resources/js/App.js ফাইল এ index.js কম্পোনেন্ট টি অ্যাড করবো এই কোড দিয়ে :require(‘./components/index’);
১৪. এবার আমরা view ফোল্ডার এর welcome ফাইল কে এডিট করবো এজন্য html বডি শেষ হওয়ার পর App.js ফাইল জাভাস্ক্রিপ্ট ফাইল হিসাবে অ্যাড করবো এভাবে


১৫. এবং এর মধ্যে যা লিখবো তাই আমাদের শো করবে
১৬.এবার প্রজেক্ট এর রুট ফোল্ডার এ cli বা কমান্ড পরাম্প এ এই কোড টি ইন্টারনেট সংযোগ সহকারে রান করে : npm run dev

১৭. এবার ব্রাউজার এ প্রজেক্ট টি রান আসবে

লারাভেল reactjs এ বুটস্ট্র্যাপ এর css ও js নিয়ে কাজ করার জন্য : আমরা সবাই বুটস্ট্র্যাপ নিয়ে কাজ করতে অভ্ভাসতো তাই আমরা নিচের পদ্ধতি অবলম্বন করবো : প্রথমে প্রজেক্ট ফোল্ডারটি cmd তে ওপেন করে লিখবো
npm install –save bootstrap এবারের কিছুক্ষন অপেক্ষা করে কমপ্লিট হলে App.js ফাইল এ বুটস্ট্রাপটি ইম্পোর্ট করবো এভাবে import Bootstrap from ‘bootstrap/dist/css/bootstrap.min.css’; এবার cmd তে npm run dev লিখে এন্টার করলে reactjs অপ্পটি বিল্ড হবে এবার আমরা প্রজেক্ট এর ইউআরএল টি রিফ্রেশ করলে তার পরিবর্তন যে যেগুলো কম্পোনেন্ট এ আমরা বুটস্ট্র্যাপ এর ক্লাস বেবহার করেছি তা কাজ করছে

লারাভেল reactjs প্রজেক্ট এ রিএক্ট router নিয়ে কাজ করা : সামাদ তে রান করি npm install react-router-dom –save কিছুক্ষন অপেক্ষা করে কমপ্লিট হলে আমরা যে ফাইল এ রিএক্ট রাউটার বেবহার করবো সেই পেজ এ ইম্পোর্ট করি এভাবে : import {
BrowserRouter as Router,
Switch,
Route,
Link
} from “react-router-dom”;

১৮.. এবার আমরা লগইন ও রেজিস্ট্রেশন সিস্টেম তৈরী করবো যাতে অন্য কীয় আমাদের এপ্লিকেশন এ ঢুকতে না পারে এজন্য প্রথমে প্রজেক্ট ফোল্ডার এ গিয়ে
১.composer require laravel/ui এই কোড টি আমাদের লাগবে না কারণ আমরা পূর্বে রিএক্ট ইনস্টল করার পূর্বে এই কোড রান করে ওই গুলো নিয়ে চি এবার নিচের কোড রান করি
২.php artisan ui:auth এবার নিচের কোড রান করি
৩.php artisan ui react –auth (আমরা যদি vue বা bootstrap উসে করি তাহলে এই কোড গুলো রান করবো php artisan ui vue –auth
এবং php artisan ui bootstrap –auth
)
৪. এবার আমরা আমাদের প্রজেক্ট কে ডাটাবেস এর সাথে কনফিগার করবো এজন্য .env ফাইল এ ডাটাবেস কনফিগার করি
৫.এবার আমাদের এপ্লিকেশন migrate করার পালা অনেক সময় মাইগ্রেট করার সময় এরর শো করে এজন্য আমরা app\Providers\AppServiceProvider.php ফোল্ডার এ এই কোড টি লিখবো

use Illuminate\Support\Facades\Schema;
এবং boot ফাঙ্কশনটি এরকম হবে
public function boot()
{
Schema::defaultStringLength(191);
}
৬.এবার migrate করার জন্য এই কোড রান করি : php artisan migrate:fresh

১৯. এবার আমরা আমাদের ইউআরএল এ http://127.0.0.1:8000/home লিখলে নিচের একটি পেজ এর ড্যাশবোর্ড শো করবে

২০.এবার আমি যদি আমার resourse /views /home.blade.php ফাইল টি ওপেন করি তাহলে এরকম কোড দেখতে পাবো

@extends('layouts.app')

@section('content')
<div class="container">
    <div class="row justify-content-center">
        <div class="col-md-8">
            <div class="card">
                <div class="card-header">Dashboard</div>

                <div class="card-body">
                    @if (session('status'))
                        <div class="alert alert-success" role="alert">
                            {{ session('status') }}
                        </div>
                    @endif

                    You are logged in!
                </div>
            </div>
        </div>
    </div>
</div>
@endsection

২১. এবার আমি এটাকে এভাবে মোডিফাই করবো

@extends('layouts.app')

@section('content')
<div class="container">
    <div id="example"></div>
</div>
@endsection

২২.এখানে দিয়েছি যাতে এখানে আমি react এর কম্পোনেন্ট নিয়ে কাজ করতে পারি

২৩. এবার আমি যদি ব্রাউসার রিফ্রেশ করি তাহলে আমি দেখতে পাবো যে example id এর মধ্যে Example component টি লোড হয়ে আছে।

২৪. এবার js/Component/Example.js ফাইল কে App.js ফাইল এ rename করি এবং তারমধ্যে কোড গুলো এরকম হবে

import React from 'react';
import ReactDOM from 'react-dom';

function Example() {
    return (
        <div className="container">
            <div className="row justify-content-center">
                <div className="col-md-8">
                    <div className="card">
                        <div className="card-header">Example Component</div>

                        <div className="card-body">I'm an example component!</div>
                    </div>
                </div>
            </div>
        </div>
    );
}

export default Example;

if (document.getElementById('example')) {
    ReactDOM.render(<Example />, document.getElementById('example'));
}

২৫ এবার js/Component/index.js ফাইল টি এরকম হবে

import React, { Component } from 'react';
import ReactDOM from 'react-dom';
// import App component
import App from './components/App'

// change the getElementId from example to app 
// render App component instead of Example
if (document.getElementById('root')) {
    ReactDOM.render(<App />, document.getElementById('root'));
}

২৬. এবার js/App.js যে ফাইল তা আছে তা এরকম হবে।

/**
 * First we will load all of this project's JavaScript dependencies which
 * includes React and other helpers. It's a great starting point while
 * building robust, powerful web applications using React + Laravel.
 */

require('./bootstrap');

/**
 * Next, we will create a fresh React component instance and attach it to
 * the page. Then, you may begin adding components to this application
 * or customize the JavaScript scaffolding to fit your unique needs.
 */

require('./components/index');

২৭. এবার home.blade.php ফাইলটি এরকম হবে যাতে আমরা example আইডি এর পরিবর্তে root এইড বেবহার করবো

@extends('layouts.app')

@section('content')
<div class="container">
    <div id="root"></div>
</div>
@endsection

২৮. এবার আমাদের js/Component/ ফোল্ডার এ বিভিন্ন কম্পোনেন্ট বানিয়ে বেবহার করার সময়

২৯.এটা করার জন্য react এ যেভাবে কম্পোনেন্ট নিয়ে কাজ করেছিলাম সেইভাবে এখানে কম্পোনেন্ট বানিয়ে কাজ করবো

৩০.এবার আমরা এখন থেকে একটি এপ্লিকেশন বানাবো এই And Eita টিউটোরিয়াল ফলো করে।

লারাভেল ও রিএক্ট এর crud স্টেপ বাই স্টেপ :
১. প্রথমে model,migration,controller তৈরী করে নেই ডেমো হিসাবে আমি Product নাম একটি রিসোর্সে কন্ট্রোলার এর সাথে মডেল তৈরী করলাম

php artisan make:model Product

product.php

<?php

namespace App;

use Illuminate\Database\Eloquent\Model;

class Product extends Model
{
    //
    protected $fillable = ['title','body'];
}

product migration file

<?php

use Illuminate\Database\Migrations\Migration;
use Illuminate\Database\Schema\Blueprint;
use Illuminate\Support\Facades\Schema;

class CreateProductsTable extends Migration
{
    /**
     * Run the migrations.
     *
     * @return void
     */
    public function up()
    {
        Schema::create('products', function (Blueprint $table) {
            $table->id();
            $table->string('title');
            $table->string('body');
            $table->timestamps();
        });
    }

    /**
     * Reverse the migrations.
     *
     * @return void
     */
    public function down()
    {
        Schema::dropIfExists('products');
    }
}

routes/api.php

Route::resource('products', 'ProductController');


laravel+reactjs crud link

laravel crud tutorial

প্রথমে লারাভেল এর project তৈরী করতে হবে। এ জন্য কমান্ড প্রম্প এ blog নাম এ একটি প্রজেক্ট তৈরী করার জন্য এই কোড টি লিখে এন্টার করি।

composer create-project --prefer-dist laravel/laravel blog

এবার আমাদের ডাটাবেস এর কনফিগার অনুযায়ী আমাদের প্রজেক্ট এর মেইন ফোল্ডার এ .env ফাইল এ ডাটাবেস এর ইনফরমেশন দিতে হবে যেমন আমার ডাটাবেস এর ইউআরএল ,উজারনেম,পাসওয়ার্ড,,ডাটাবেস নাম ইত্যাদি।

DB_CONNECTION=mysql
DB_HOST=127.0.0.1
DB_PORT=3306
DB_DATABASE=test
DB_USERNAME=root
DB_PASSWORD=root

Route.php

Route::resource('/student', 'StudentController');

Create a student controller ,model,migration File

php artisan make:model Student -mcr

Student.php

<?php

namespace App;

use Illuminate\Database\Eloquent\Model;

class Student extends Model
{
    //
    protected $table = "students";
    protected $fillable = ['name','roll','class'];

}

StudentController.php

<?php

namespace App\Http\Controllers;

use App\Student;
use Illuminate\Http\Request;

class StudentController extends Controller
{
    /**
     * Display a listing of the resource.
     *
     * @return \Illuminate\Http\Response
     */
    public function index()
    {
        //

        $data = Student::all();
        return view('student.index',compact('data'));
    }

    /**
     * Show the form for creating a new resource.
     *
     * @return \Illuminate\Http\Response
     */
    public function create()
    {
        //
        return view ('student.save');
    }

    /**
     * Store a newly created resource in storage.
     *
     * @param  \Illuminate\Http\Request  $request
     * @return \Illuminate\Http\Response
     */
    public function store(Request $request)
    {
        //
        $validatedData = $request->validate([
            'name'=>'required|max:255',
            'roll'=>'required',
            'class'=>'required'
        ]);
        $show = Student::create($validatedData);
        return redirect('/student')->with('successs','Student Added');
    }

    /**
     * Display the specified resource.
     *
     * @param  \App\Student  $student
     * @return \Illuminate\Http\Response
     */
    public function show(Student $student)
    {
        //
    }

    /**
     * Show the form for editing the specified resource.
     *
     * @param  \App\Student  $student
     * @return \Illuminate\Http\Response
     */
    public function edit($id)
    {
        //
        $studentedit = Student::findOrFail($id);
        return view('student.edit')->with('data',$studentedit);
    }

    /**
     * Update the specified resource in storage.
     *
     * @param  \Illuminate\Http\Request  $request
     * @param  \App\Student  $student
     * @return \Illuminate\Http\Response
     */
    public function update(Request $request,  $id)
    {
        //
        $validatedData = $request->validate([
            'name'=>'required',
            'roll'=>'required',
            'class'=>'required'
        ]);

        $studentupdate = Student::whereId($id)->update($validatedData);
        return redirect('/student')->with('success','Data is successfully updated');
    }

    /**
     * Remove the specified resource from storage.
     *
     * @param  \App\Student  $student
     * @return \Illuminate\Http\Response
     */
    public function destroy( $id)
    {
        //

        $deleteid = Student::findOrFail( $id);
        $deleteid->delete();
        return redirect('/student')->with('success','Data is successfully Deleted');

    }
}

Migration File

<?php

use Illuminate\Database\Migrations\Migration;
use Illuminate\Database\Schema\Blueprint;
use Illuminate\Support\Facades\Schema;

class CreateStudentsTable extends Migration
{
    /**
     * Run the migrations.
     *
     * @return void
     */
    public function up()
    {
        Schema::create('students', function (Blueprint $table) {
            $table->id();
            $table->string('name');
            $table->string('roll');
            $table->string('class');
            $table->timestamps();
        });
    }

    /**
     * Reverse the migrations.
     *
     * @return void
     */
    public function down()
    {
        Schema::dropIfExists('students');
    }
}

Layout View File under student folder resource/view/student/

layout.blade.php

<!DOCTYPE html>
<html lang="en">
<head>
    <meta charset="UTF-8">
    <meta name="viewport" content="width=device-width, initial-scale=1.0">
    <meta http-equiv="X-UA-Compatible" content="ie=edge">
    <title>Document</title>
    <link rel="stylesheet" href="https://maxcdn.bootstrapcdn.com/bootstrap/4.4.1/css/bootstrap.min.css">

</head>
<body>
    <div class="container">
        @yield('content')
    </div>
</body>
</html>

index.blade.php

@extends('student.layout')
@section('content')
<div class="row">
<a href="/student/create">Aadd Students</a>
    <div class="col-md-12 margin-tb">
            <table class="table-responsive table-bordered">
                <thead>
                    <th>Id</th>
                    <th>Name</th>
                    <th>Roll</th>
                    <th>Class</th>

                    <th>aAction</th>

                </thead>
                <tbody>
                    @foreach ($data as $row)
                    <tr><td>{{$row->id}}</td>
                    <td>{{$row->name}}</td>
                    <td>{{$row->roll}}</td>
                    <td>{{$row->class}}</td>

                    <td><a href="{{route('student.edit',$row->id)}}">Edit</a></td>
                    <td> <form action="{{route('student.destroy',$row->id)}}" method="post">
                        @csrf
                        @method('DELETE')                        <button class="btn btn-danger" type="submit">Delete</button>
                    </form>
                    </td>
                   </tr>
                    @endforeach
                </tbody>
            </table>
    </div>
</div>
@endsection

save.blade.php

@extends ('student.layout')
@section('content')
<div class="card-body">
    @if ($errors->any())
      <div class="alert alert-danger">
        <ul>
            @foreach ($errors->all() as $error)
              <li>{{ $error }}</li>
            @endforeach
        </ul>
      </div><br />
    @endif
<form action="{{route('student.store')}}" method="post">
    @csrf
    <div class="form-group">
              @csrf
              <label for="name">Name:</label>
              <input type="text" id="name" class="form-control" name="name"/>
          </div>
          <div class="form-group">
              <label for="roll">Roll :</label>
              <input type="text" id='roll' class="form-control" name="roll"/>
          </div>
         <div class="form-group">
         <label for="roll">Class :</label>
              <input type="text" id='roll' class="form-control" name="class"/>
         </div>
         <button type="submit" class="btn btn-primary">Add Data</button>
      </form>
</form>
@endsection

edit.blade.php

@extends('student.layout')
@section('content')
<div class="row">
    <div class="col-md-12">
    @if ($errors->any())
      <div class="alert alert-danger">
        <ul>
            @foreach ($errors->all() as $error)
              <li>{{ $error }}</li>
            @endforeach
        </ul>
      </div><br />
    @endif
        <form action="{{route('student.update',$data->id)}}" method="post">
            @csrf
            @method('PATCH')
            <div class="form-group">
                <label for="name">Name</label>
                <input id="name" class="form-control" type="text" name="name" value="{{$data->name}}">
            </div>
            <div class="form-group">
                <label for="roll">Roll</label>
                <input id="roll" class="form-control" type="text" name="roll" value="{{$data->roll}}">
            </div>
            <div class="form-group">
                <label for="class">Class</label>
                <input id="class" class="form-control" type="text" name="class" value="{{$data->class}}">
            </div>
            <button class="btn btn-primary" type="submit">Update</button>
        </form>
    </div>
</div>
@endsection

Laravel Reference By Oleetech

Laravel Database Column Datatype

Command	Description
$table->bigIncrements('id');
$table->bigInteger('votes');	  BIGINT equivalent for the database.
$table->binary('data');	          BLOB equivalent for the database.
$table->boolean('confirmed');	  BOOLEAN equivalent for the database.
$table->char('name', 4);	  CHAR equivalent with a length.
$table->date('created_at');	  DATE equivalent for the database.
$table->dateTime('created_at');	  DATETIME equivalent for the database.
$table->dateTimeTz('created_at'); DATETIME (with timezone) for  database.
$table->decimal('amount', 5, 2);  DECIMAL  with a precision and scale.
$table->double('column', 15, 8);  DOUBLE equivalent with precision, 15 digits in total and 8 after the decimal point.
$table->enum('choices', ['foo', 'bar']);
ENUM equivalent for the database.
$table->float('amount');	FLOAT equivalent for the database.
$table->increments('id');	Incrementing ID (primary key) using a “UNSIGNED INTEGER” equivalent.
$table->integer('votes');	INTEGER equivalent for the database.
$table->ipAddress('visitor');	IP address equivalent for the database.
$table->json('options');	JSON equivalent for the database.
$table->jsonb('options');	JSONB equivalent for the database.
$table->longText('description');	LONGTEXT equivalent for the database.
$table->macAddress('device');	MAC address equivalent for the database.
$table->mediumInteger('numbers');	MEDIUMINT equivalent for the database.
$table->mediumText('description');	MEDIUMTEXT equivalent for the database.
$table->morphs('taggable');	Adds INTEGER taggable_id and STRINGtaggable_type.
$table->nullableTimestamps();	Same as timestamps(), except allows NULLs.
$table->rememberToken();	Adds remember_token as VARCHAR(100) NULL.
$table->smallInteger('votes');	SMALLINT equivalent for the database.
$table->softDeletes();	Adds deleted_at column for soft deletes.
$table->string('email');	VARCHAR equivalent column.
$table->string('name', 100);	VARCHAR equivalent with a length.
$table->text('description');	TEXT equivalent for the database.
$table->time('sunrise');	TIME equivalent for the database.
$table->timeTz('sunrise');	TIME (with timezone) equivalent for the database.
$table->tinyInteger('numbers');	TINYINT equivalent for the database.
$table->timestamp('added_on');	TIMESTAMP equivalent for the database.
$table->timestampTz('added_on');	TIMESTAMP (with timezone) equivalent for the database.
$table->timestamps();	Adds created_at and updated_at columns.
$table->uuid('id');	UUID equivalent for the database.