<?php

namespace App\Models;

use Illuminate\Database\Eloquent\Factories\HasFactory;
use Illuminate\Database\Eloquent\Model;

class Test extends Model
{
    use HasFactory;

    protected $guarded = [ "_token" ];
}
Controller Area
<?php

namespace App\Http\Controllers;

use App\Models\Test;
use Illuminate\Http\Request;

class TestController extends Controller
{
    /**
     * Display a listing of the resource.
     *
     * @return \Illuminate\Http\Response
     */
    public function index()
    {
        return view('test');
    }

    /**
     * Show the form for creating a new resource.
     *
     * @return \Illuminate\Http\Response
     */
    public function create()
    {
        //
    }

    /**
     * Store a newly created resource in storage.
     *
     * @param  \Illuminate\Http\Request  $request
     * @return \Illuminate\Http\Response
     */
    public function store(Request $request)
    {
        // Validate Data
        $validatedData = $request->validate([
            "name.*"  => "required|string|min:1",
        ]);
   $data = $request->except(['_token']);

   for ($i=0; $i < count($data['name']) ; $i++) {
       $test = new Test;
       foreach($data as $key => $name){
        $test->$key = $data[$key][$i];
       }
       $test->save();

   }


    }

    /**
     * Display the specified resource.
     *
     * @param  \App\Models\test  $test
     * @return \Illuminate\Http\Response
     */
    public function show(test $test)
    {
        //
    }

    /**
     * Show the form for editing the specified resource.
     *
     * @param  \App\Models\test  $test
     * @return \Illuminate\Http\Response
     */
    public function edit(test $test)
    {
        //
    }

    /**
     * Update the specified resource in storage.
     *
     * @param  \Illuminate\Http\Request  $request
     * @param  \App\Models\test  $test
     * @return \Illuminate\Http\Response
     */
    public function update(Request $request, test $test)
    {
        //
    }

    /**
     * Remove the specified resource from storage.
     *
     * @param  \App\Models\test  $test
     * @return \Illuminate\Http\Response
     */
    public function destroy(test $test)
    {
        //
    }
}
১.লারাভেল এর রুট ডিরেক্টরিতে package নামে একটি ফোল্ডার তৈরী করি।
প্যাকেজ ফোল্ডার এর মধ্যে vendor এর নাম হিসাবে olee নামে একটি ফোল্ডার তৈরী করি
olee ফোল্ডার এর মধ্যে আমরা যে নামে প্যাকেজ তৈরী করবো সে নামে একটি ফোল্ডার তৈরী করি যেমন sociallink .
sociallink ফোল্ডার এর মধ্যে src নামে একটি ফোল্ডার তৈরী করি।
src ফোল্ডার এর মধ্যে cmd ওপেন করে কমান্ড composer init লিখে এন্টার করলে পরবর্তী নির্দেশনা অবলম্বন করলে একটি src ফোল্ডার এ composer.json নামে একটি ফাইল তৈরী হবে
এবার লারাভেল প্রজেক্ট এর রুট ফোল্ডার এ composer.json নামের ফাইলটি ওপেন করে তাতে আমাদের ভেন্ডর প্যাকেজ টি অ্যাড করি।
এখানে “olee\items হলো ভেন্ডর ও প্যাকেজ এর নাম এই দুইটা আমাদের ভেন্ডর ও নাম অনুযায়ী পরিবর্তন করবো।
এবার আমাদের সার্ভিস প্রোভাইডার অ্যাড করতে হবে এজন্য লারাভেল প্রজেক্ট এর রুট ফোল্ডার এ cmd তে কমান্ড রান করি php artisan make:provider SocialLinkServiceProvider
এই কমান্ড আমাদের লারাভেল প্রজেক্ট এর app/Providers ফোল্ডার এ SocialLinkServiceProvider নামে একটি ফাইল তৈরী হবে এটাকে আমরা আমাদের প্যাকেজ ফোল্ডার এর src ফোল্ডার মুভ করে নিয়ে এসব এবং ফাইল টি ওপেন করে এর নেমস্পেস চেঞ্জ করবো। namespace olee\sociallink;
এবার লারাভেল প্রজেক্ট এর রুট ফোল্ডার এ cmd তে কমান্ড রান করি composer dump-autoload
SocialLinkServiceProvider ক্লাসটি প্রজেক্ট এর রুট ডিরেক্টরি তে config/app এ প্রোভাইডার ক্লাস অ্যাড করি olee\sociallink\SocialLinkServiceProvider::class,
src ফোল্ডার এর মধ্যে controllers,views নামে দুইটি ফোল্ডার তৈরী করি।
আমাদের প্যাকেজ এর src ফোল্ডার এ composer.json আপডেট করি
প্যাকেজ এর route ডিফাইন করার জন্য routes.php নামে ফাইল তৈরী করি। এবং তার মধ্যে লিখি
<?php

use Illuminate\Support\Facades\Route;
SocialLinkServiceProvider এর boot এবং রেজিস্টার ফাঙ্কশন এর মধ্যে নিচের মতো হবে।
     * Register services.
     *
     * @return void
     */
    public function register()
    {
        $this->loadViewsFrom(__DIR__.'/views', 'sociallink');
    }

    /**
     * Bootstrap services.
     *
     * @return void
     */
    public function boot()
    {
        include __DIR__.'/routes.php';


    }
এবার আমরা কন্ট্রোলার ফাইল তৈরী করবো cmd তে কমান্ড টাইপ করে কন্ট্রোলার তৈরী করি যা app/Controllers ফোল্ডার এ controller.php কপি করে আমাদের প্যাকেজ এর controllers ফোল্ডার এ রাখবো এবং app/Controllers ফোল্ডার এ আমাদের বানানো কন্ট্রোলার টি মুভ করে আমাদের প্যাকেজ এর controllers ফোল্ডার এ রাখবো এবং নেমস্পেস পরিবর্তন করবো আমাদের প্যাকেজ ভেন্ডর নাম অনুসারে
controller.php ফাইলের নেমস্পেস হবে এরকম namespace olee\sociallink \Controllers;
SocialLinkController.php ফাইলের নেমস্পেস হবে এরকম namespace olee\sociallink \Controllers;
এবার আমাদের কন্ট্রোলার টি routes.php তে অ্যাড করবো
use olee\sociallink\Controllers\SocialLink;
Route::get('/posts', [SocialLinkController::class, 'index'])->name('posts.store');
Model নিয়ে কাজ করা। কমান্ড এর মাধ্যমে মডেল তৈরী করি যা app/models ফোল্ডার এ একটি মডেল তৈরী করে এবার প্যাকেজ এর src ফোল্ডার এ models নামে ফোল্ডার তৈরী করি এবং কমান্ড দ্বারা বানানো মডেল টি মুভ করে এবার প্যাকেজ এর src ফোল্ডার এ models আন্তে হবে এবং নেমস্পেস পরিবর্তন করি
sociallink কন্ট্রোলার ফাইল এ মডেলটি অ্যাড করতে হবে use olee\sociallink\Models\SocialLink;
মডেল ফাইলটি হবে এরকম
<?php

namespace olee\sociallink\Models;

use Illuminate\Database\Eloquent\Factories\HasFactory;
use Illuminate\Database\Eloquent\Model;

class SocialLink extends Model
{
    use HasFactory;
    protected $table = "metal_buttons";
    protected $fillable = ['title ','description'];
}
কন্ট্রোলার ফাইলটি হবে এরকম
<?php

namespace olee\sociallink\Controllers;

use Illuminate\Http\Request;
use olee\sociallink\Models\SocialLink;
class SocialLinkController extends Controller
{
    public function test (){
     $data =  SocialLink::all();
return $data ;
    }
}
মাইগ্রেশন ফাইল অ্যাড করা : প্রথমে মাইগ্রেশন ফাইল তৈরী করে প্যাকেজ এর src ফোল্ডার এর migrations নামে ফোল্ডার তৈরী করে তারমধ্যে মাইগ্রেশন ফাইল রাখতে এবং সার্ভিস প্রোভাইডার এ বুট ফাঙ্কশন এ অ্যাড করতে হবে এভাবে
<?php

namespace olee\sociallink;

use Illuminate\Support\ServiceProvider;

class SocialLinkServiceProvider extends ServiceProvider
{
    /**
     * Register services.
     *
     * @return void
     */
    public function register()
    {
        $this->loadViewsFrom(__DIR__.'/views', 'sociallink');
    }

    /**
     * Bootstrap services.
     *
     * @return void
     */
    public function boot()
    {
        include __DIR__.'/routes.php';
        $this->loadMigrationsFrom(__DIR__.'/migrations');
    }
}
view ফোল্ডার হতে কন্ট্রোলার এ ভিউ লোড করা:
আমরা ভিউ রেজিস্টার করার সময় সেকেন্ড প্যারামিটার হিসাবে আমাদের ভিউ আইডেন্টিফায়ার হিসাবে items নিয়েছিলাম { $this->loadViewsFrom(DIR.’/views’, ‘items’); } এবার ভিউ ফোল্ডার এর create.blade.php ফাইল কে কন্ট্রোলার এ এভাবে কল করবো
    public function index()
    {
        return view("items::create");
    }
<?php

namespace App;
use Illuminate\Contracts\Auth\MustVerifyEmail;
use Illuminate\Foundation\Auth\User as Authenticatable;
use Illuminate\Notifications\Notifiable;
use Laravel\Passport\HasApiTokens;

class User extends Authenticatable
{
    use Notifiable, HasApiTokens;

    /**
     * The attributes that are mass assignable.
     *
     * @var array
     */
    protected $fillable = [
        'name', 'email', 'password',
    ];

    /**
     * The attributes that should be hidden for arrays.
     *
     * @var array
     */
    protected $hidden = [
        'password', 'remember_token',
    ];

    /**
     * The attributes that should be cast to native types.
     *
     * @var array
     */
    protected $casts = [
        'email_verified_at' => 'datetime',
    ];
}
এবার app/Providers/AuthServiceProvider.php ফাইলটি ওপেন করে কনফিগার করি
<?php
namespace App\Providers;
use Laravel\Passport\Passport;
use Illuminate\Support\Facades\Gate;
use Illuminate\Foundation\Support\Providers\AuthServiceProvider as ServiceProvider;


class AuthServiceProvider extends ServiceProvider
{
    /**
     * The policy mappings for the application.
     *
     * @var array
     */
    protected $policies = [
        'App\Model' => 'App\Policies\ModelPolicy',
    ];


    /**
     * Register any authentication / authorization services.
     *
     * @return void
     */
    public function boot()
    {
        $this->registerPolicies();
    }
}
মডেল ও ডাটাবেস এ লগইন ইউসার ছাড়া অন্য কেউ যাতে ডাটা এক্সেস না করতে পারে এজন্য মাইগ্রেশন ফাইল ও ইউসার ফাইল এর মাঝে সম্পর্ক করতে হবে মনে করি আমি student নাম একটি মাইগ্রেশন ফাইল একটি মডেল ও একটি কন্ট্রোলার আছে তাহলে এটাকে কনফিগার করতে প্রথমে মাইগ্রেশন ফাইল এ এভাবে রিলেশন করতে হবে।
composer create-project --prefer-dist laravel/laravel blog
Start Development Server :
php artisan serve
Make Model With Migration :
php artisan make:model Book -m
Model class Coustomization :
<?php

namespace App;

use Illuminate\Database\Eloquent\Model;

class Book extends Model
{
    // define table name
    protected $table = "books";
// define which column fill by data
protected $fillable = ['name'];
    // define primary Key
    protected $primaryKey = 'code';
    // define incrementing primary key
    public $incrementing = false;
    // automatically manage created and updated column
    public $timestumps = false;

    // $book->date->format('m-d-Y');
    // protected $dateFormate = "U";
    protected $dateFormat = 'Y-m-d';

    // change created_at And updated_at column name
    const CREATED_AT = 'creation_date';
    const UPDATED_AT = "modify_date";
    // change database Connection Name to use default connection  no need below line
    protected $connection = "sqlsrv";


//   set default attribute for specific column
protected $attributes = ['country'=>"Bangladesh"] ;

}
Retrieving Data From Models :
Get All Data And Print Data :
// Get All Data From Model And Store In a Variable You Can Pass It Any Where
$books = App\Books::all();
// Print Data
foreach ($books as $value) {
    echo $value->code;
}
here what i found after carefully reading core files of api-tester, and it works for me in laravel version > 5.8
you need to change some files in vendor\asvae\laravel-api-tester folder

Step 1:
first of all open vendor\asvae\laravel-api-tester\resources\views\api-tester.blade.php
and replace some code
From:
<link media="all" type="text/css" rel="stylesheet" href="{{ route('api-tester.file', ['file' => 'api-tester.css']) }}">
To:
<link media="all" type="text/css" rel="stylesheet" href="{{ route('api-tester.file', ['_file' => 'api-tester.css']) }}">

also need to do some more in same file:

From:
<script src="{{ route('api-tester.file', ['file' => 'api-tester.js']) }}"></script>
To:
<script src="{{ route('api-tester.file', ['_file' => 'api-tester.js']) }}"></script>

Step 2:
if you are not running your system on PHP v7.4 then skip the step 2
open vendor\asvae\laravel-api-tester\src\Storages folder and find JsonStorage.php
on line # 57 Replace the code

From:
$this->path = implode($path,'/');

To:
$this->path = implode('/',$path);

Step 3:

open vendor\asvae\laravel-api-tester\src\Entities folder and find RouteInfo.php
on line # 190 Replace the code

From:

if (is_string($uses) && str_contains($uses, '@')) {

To:
if (is_string($uses) && Str::contains($uses, '@')) {

also dont forget to add below line at top of the page
use Illuminate\Support\Str;
that's it Now enjoy with your output.
DB_CONNECTION=mysql
 DB_HOST=127.0.0.1
 DB_PORT=3306
 DB_DATABASE=here your database name here
 DB_USERNAME=here database username here
 DB_PASSWORD=here database password here
Create Migration File : open Cmd In Project Folder And Run Script
php artisan make:migration migrationfilename
Create Database Table And Column With Migration File : open migration File And edit with tablename
public function up()
 {
     Schema::create('tablename', function (Blueprint $table) {
         $table->increments('id');
         $table->string('name')->nullable();
         $table->string('email')->nullable();
         $table->timestamps();
     });
 }
Migration Comand:
php artisan migrate
Migration Rules :
<?php

use Illuminate\Database\Migrations\Migration;
use Illuminate\Database\Schema\Blueprint;
use Illuminate\Support\Facades\Schema;

class CreateOITMSTable extends Migration
{
    /**
     * Run the migrations.
     *
     * @return void
     */
    public function up()
    {
        Schema::create('o_i_t_m_s', function (Blueprint $table) {
            $table->id();
            $table->engine = 'InnoDB';
            $table->boolean('is_publish')->default(0);
            $table->charset = 'utf8mb4';
            $table->string('ItemCode',50)->comment('Item No.');
            $table->string('CodeBars',254)->comment('Bar Code');
            $table->mediumText('ItemName',100)->comment('Item Description');
            $table->string('FrgnName',100)->comment('Foreign Name')->nullable();
            $table->bigInteger('ItmsGrpCod',6)->comment('Item Group');
            $table->string('ItemType',50)->comment('Item Type');
            $table->char('VATLiable',1)->comment('Tax Liable');
            $table->date('created_date')->comment('Created Date');
            $table->dateTime('created_time', 10)->comment('Created Time');
            $table->decimal('unit_price', 8, 2)->comment('Unit Price');
            $table->enum('status', ['Pending', 'Wait', 'Active'])->default('Pending');
            $table->longText('remarks')->comment('Item Remarks')->default("");
            $table->smallInteger('qty',12)->comment('Quantity');
            $table->macAddress('device')->comment('Device Macaddress');
            $table->timestamps();
        });
    }

    /**
     * Reverse the migrations.
     *
     * @return void
     */
    public function down()
    {
        Schema::dropIfExists('o_i_t_m_s');
    }
}
Solve Migration Error for Default String Length :app/providers/AppServiceProvider.php and put the below code :
use Illuminate\Support\Facades\Schema;


function boot()
{
    Schema::defaultStringLength(191);
}
Create Resource Route : Include In Route/Web.php
Route::resource('ajax-crud', 'AjaxController');
Make Controller: Open Cmd In Project Folder And Run Script
In addition to @chanafdo answer, you can use route name

when working with laravel blade

<a href="{{route('login')}}">login here</a>
with parameter in route name

when go to url like URI: profile/{id}
<a href="{{route('profile', ['id' => 1])}}">login here</a>

without blade

<a href="<?php echo route('login')?>">login here</a>

with parameter in route name

when go to url like URI: profile/{id}
<a href="<?php echo route('profile', ['id' => 1])?>">login here</a>
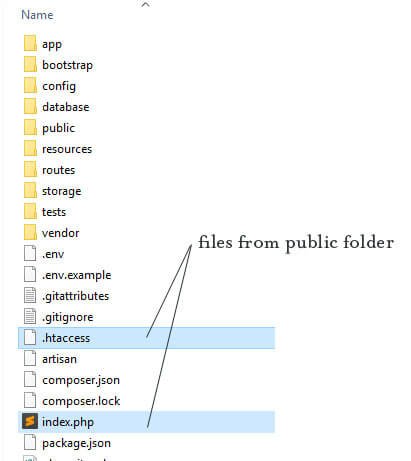
cut index.php and httaccs file and past in project root directory
Open index.php and replace
require __DIR__.'/../vendor/autoload.php';
 TO
require __DIR__.'/vendor/autoload.php';

$app = require_once __DIR__.'/../bootstrap/app.php';
TO
$app = require_once __DIR__.'/bootstrap/app.php';
Save and close the file. Go to your browser and reload your page. Now, you should see the Laravel’s welcome page.
লারাভেল এ ভিউ ডিজাইন এ দরকারি ফানঃশন :
<!-- CSRF Token -->
    <meta name="csrf-token" content="{{ csrf_token() }}">

<!-- Get App Name And Show
set config/app.php
'name' => 'Laravel',
And also inside .env file
APP_NAME=your_app_name

<title>Invoice - {{ config('app.name', 'Inventory Management System') }}</title>

// Show Date with Formate
Date: {{ date('l, d-M-Y h:i:s A') }}

//Show Price With Format
{{ number_format($content->price, 2) }}