Android Create Gradient Background Xml Tutorial

create an xml file in res/drawable. I am calling my_gradient_drawable.xml:

<?xml version="1.0" encoding="utf-8"?>
<shape xmlns:android="http://schemas.android.com/apk/res/android">
    <gradient
        android:type="linear"
        android:angle="0"
        android:startColor="#f6ee19"
        android:endColor="#115ede" />
</shape>

type=”linear”

Set the angle for a linear type. It must be a multiple of 45 degrees.

Gradient Type Linear And Angle View

type=”radial”

<gradient
    android:type="radial"
    android:gradientRadius="10%p"
    android:startColor="#f6ee19"
    android:endColor="#115ede" />
Radius Type Linear And Angle View

type=”sweep”

I don’t know why anyone would use a sweep, but I am including it for completeness. I couldn’t figure out how to change the angle, so I am only including one image.

<gradient
    android:type="sweep"
    android:startColor="#f6ee19"
    android:endColor="#115ede" />
Sweep Gradiant

center

You can also change the center of the sweep or radial types. The values are fractions of the width and height. You can also use %p notation.

android:centerX="0.2"
android:centerY="0.7"
Sweep Center


Android Toolbar With Action Menu

  1. Add Dependency In build.gradle (Module:App)  And Sync
implementation  'com.android.support:design:28.0.0'

2. Goto activity_main.xml And Add This Code

<android.support.v7.widget.Toolbar xmlns:android="http://schemas.android.com/apk/res/android"
    android:layout_width="match_parent"
    android:layout_height="wrap_content"
    android:id="@+id/toolbar"  <!-- Set Id for Find the Toolbar-->
    android:background="@color/colorPrimary" <!-- Set Background Color -->
    android:theme="@style/ThemeOverlay.AppCompat.Dark"> <!--Set Theme -->
    app:logo="@drawable/logo"><!-- logo for the Toolbar-->
    app:logoDescription="LOGO"><!-- logo and logo description for the Toolbar-->
    app:navigationIcon="@drawable/logo"><!-- navigation icon for the Toolbar-->
 app:navigationContentDescription="Navigation Description"
    app:title="AbhiAndroid">
    <!-- title for the Toolbar-->
 app:titleTextColor="#F00" <!-- title text color for the Toolbar-->
app:subtitle="AbhiAndroid">
    <!-- sub title for the Toolbar-->
  app:subtitleTextColor="#F00">
    <!-- sub title text  color for the Toolbar-->
</android.support.v7.widget.Toolbar>

3.Go to MainActivity.java And Add This Code For Setting Toolbar as An ActionBar:

 Toolbar toolbar = (Toolbar) findViewById(R.id.toolbar); // get the reference of Toolbar
setSupportActionBar(toolbar); // Setting/replace toolbar as the ActionBar

If You Need To Define Toolbar Property Programmatically You Can Use Below Important Function For Toolbar .

setLogo(int resId): Example : toolbar.setLogo(R.drawable.logo); // setting a logo in toolbar.
setLogo(Drawable drawable): Example :toolbar.setLogo(getResources().getDrawable(R.drawable.logo)); // setting a logo in toolbar
setLogoDescription(CharSequence description):Example :toolbar.setLogoDescription("LOGO"); // set description for the logo
setLogoDescription(int resId): Example :toolbar.setLogoDescription(getResources().getString(R.string.descrition)); // set description for the logo
getLogoDescription(): Example :CharSequence logoDescription=toolbar.getLogoDescription(); // get the logo description from Toolbar
setNavigationIcon(int resId):  Example : toolbar.setNavigationIcon(R.mipmap.ic_launcher); // set icon for navigation button
getNavigationIcon(): Example :Drawable navigationIcon = toolbar.getNavigationIcon(); // get navigation icon from Toolbar
setTitle(int resId):  Example : toolbar.setTitle(getResources().getString(R.string.title)); // setting a title for this Toolbar
setTitle(CharSequence title):  Example : toolbar.setTitle("AbhiAndroid"); // setting a title for this Toolbar
setSubtitle(int resId):  Example : toolbar.setSubtitle(getResources().getString(R.string.subTitle)); // setting a sub title for this Toolbar
.setNavigationIcon(R.drawable.logo) : Example : toolbar.setNavigationIcon(int resId); // set icon for navigation button
setTitleTextColor(int color): Example : toolbar.setTitleTextColor(Color.RED); // set title text color for Toolbar.
setSubtitleTextColor(int color): Example : toolbar.setSubtitleTextColor (Color.RED); // set sub title text color for Toolbar
setNavigationOnClickListener(View.OnClickListener listener): Example : // implement setNavigationOnClickListener event
toolbar.setNavigationOnClickListener(new View.OnClickListener() {
@Override
public void onClick(View view) {
// add code here that execute on click of navigation button
}
});


Step By Step To Set Action Menu In Toolbar/Action bar

Go to the res / menu / menu_main.xml for your project and add a new menu with a single element You Can Set Any Name For Your Menu Layout File Here We Define menu_main.xml .


<?xml version="1.0" encoding="utf-8"?>
<menu xmlns:android="http://schemas.android.com/apk/res/android"
      xmlns:app="http://schemas.android.com/apk/res-auto"
      xmlns:tools="http://schemas.android.com/tools"
      tools:context=".MainActivity">

    <item
        android:id="@+id/action_favorite"
        android:orderInCategory="300"
        android:title="User"
        android:icon="@drawable/ic_favorite"
        app:showAsAction="ifRoom"></item>
 <item <a>android:id="@+id/action_add</a>"
          <a>android:icon="@drawable/ic_menu_add</a>"
          <a>android:title="ifRoom</a>"
          <a>android:showAsAction="ifRoom</a>"></item>
    <item <a>android:id="@+id/action_delete</a>"
          <a>android:icon="@drawable/ic_menu_delete</a>"
          <a>android:title="Delete</a>"
          <a>android:showAsAction="never</a>"></item>

</menu>

The most important property is  android:showAsAction . You See Above Show As Icon Set The Visibility On Menu Area .

Inflate Menu Layout To Toolbar Menu Area .

   @Override
    public boolean onCreateOptionsMenu(Menu menu) {
        // Inflate the menu; this adds items to the action bar if it is present.
        getMenuInflater().inflate(R.menu.menu_main, menu);
        return true;
    }

    @Override
    public boolean onOptionsItemSelected(MenuItem item) {
        // Handle action bar item clicks here. The action bar will
        // automatically handle clicks on the Home/Up button, so long
        // as you specify a parent activity in AndroidManifest.xml.
        int id = item.getItemId();

        //noinspection SimplifiableIfStatement
        if (id == R.id.action_favorite) {
            Toast.makeText(MainActivity.this, "Action clicked", Toast.LENGTH_LONG).show();
            return true;
        }

        return super.onOptionsItemSelected(item);
    }

Android Volley JsonObject Request Custom Adapter As BaseAdapter With Arraylist And Model Class

  1. Main Activity.xml
<?xml version="1.0" encoding="utf-8"?>
<LinearLayout xmlns:android="http://schemas.android.com/apk/res/android"
    xmlns:app="http://schemas.android.com/apk/res-auto"
    xmlns:tools="http://schemas.android.com/tools"
    android:layout_width="match_parent"
    android:layout_height="match_parent"
    android:orientation="vertical"
    tools:context=".MainActivity">
    <Button
        android:text="Show Data"
        android:id="@+id/showbtn"
        android:layout_width="match_parent"
        android:layout_height="wrap_content" />

<ListView
    android:id="@+id/list"
    android:layout_width="match_parent"
    android:layout_height="match_parent"></ListView>


</LinearLayout>


2. mylist.xml

<?xml version="1.0" encoding="utf-8"?>
<LinearLayout
    android:orientation="vertical"
    xmlns:android="http://schemas.android.com/apk/res/android" android:layout_width="match_parent"
    android:layout_height="match_parent">
<TextView
    android:id="@+id/EmployeeID"
    android:layout_width="match_parent"
    android:layout_height="wrap_content" />

    <TextView
    android:id="@+id/LastName"
    android:layout_width="match_parent"
    android:layout_height="wrap_content" />

    <TextView
    android:id="@+id/FirstName"
    android:layout_width="match_parent"
    android:layout_height="wrap_content" />
</LinearLayout>

3. Employee.java

package com.example.ppc.jsonarraycustomlistview;

public class Employee {


    String fname;
    String lname;

    public Employee() {
    }

    public Employee( String fname, String lname) {

        this.fname = fname;
        this.lname = lname;
    }


    public String getFname() {
        return fname;
    }

    public String getLname() {
        return lname;
    }


    public void setFname(String fname) {
        this.fname = fname;
    }

    public void setLname(String lname) {
        this.lname = lname;
    }
}

4. CustomAdapter.JAVA

package com.example.ppc.jsonarraycustomlistview;

import android.content.Context;
import android.view.LayoutInflater;
import android.view.View;
import android.view.ViewGroup;
import android.widget.BaseAdapter;
import android.widget.TextView;

import java.util.ArrayList;

public class CustomAdapter extends BaseAdapter {
    private Context context;
private ArrayList<Employee> mylist;

    public CustomAdapter(Context context, ArrayList<Employee> mylist) {
        this.context = context;
        this.mylist = mylist;
    }

    @Override
    public int getCount() {
        return mylist.size();
    }

    @Override
    public Object getItem(int position) {
        return mylist.get(position);
    }

    @Override
    public long getItemId(int position) {
        return 0;
    }

    @Override
    public View getView(int position, View convertView, ViewGroup parent) {
        LayoutInflater layoutInflater = (LayoutInflater) context.getSystemService(Context.LAYOUT_INFLATER_SERVICE);
        View view= layoutInflater.inflate(R.layout.mylist,null);
        TextView firstname = view.findViewById(R.id.FirstName);
        TextView lastname = view.findViewById(R.id.LastName);
        firstname.setText(mylist.get(position).fname);
        lastname.setText(mylist.get(position).lname);
        return view;
    }
}

5. AndroidManifest.xml Only Need Internet permission

<?xml version="1.0" encoding="utf-8"?>
<manifest xmlns:android="http://schemas.android.com/apk/res/android"
    package="com.example.ppc.jsonarraycustomlistview">
<uses-permission android:name="android.permission.INTERNET"></uses-permission>
    <application
        android:allowBackup="true"
        android:icon="@mipmap/ic_launcher"
        android:label="@string/app_name"
        android:roundIcon="@mipmap/ic_launcher_round"
        android:supportsRtl="true"
        android:theme="@style/AppTheme">
        <activity android:name=".MainActivity">
            <intent-filter>
                <action android:name="android.intent.action.MAIN" />

                <category android:name="android.intent.category.LAUNCHER" />
            </intent-filter>
        </activity>
    </application>

</manifest>

6. Add Volley Library

   implementation 'com.android.volley:volley:1.1.1'

7. MainActivity.java

package com.example.ppc.jsonarraycustomlistview;

import android.support.v7.app.AppCompatActivity;
import android.os.Bundle;
import android.view.View;
import android.widget.ArrayAdapter;
import android.widget.Button;
import android.widget.ListView;

import com.android.volley.Request;
import com.android.volley.RequestQueue;
import com.android.volley.Response;
import com.android.volley.VolleyError;
import com.android.volley.toolbox.JsonArrayRequest;
import com.android.volley.toolbox.JsonObjectRequest;
import com.android.volley.toolbox.JsonRequest;
import com.android.volley.toolbox.Volley;

import org.json.JSONArray;
import org.json.JSONException;
import org.json.JSONObject;

import java.util.ArrayList;

public class MainActivity extends AppCompatActivity {
private ListView listView;
private Button button;
private ArrayList<Employee> mylist = new ArrayList<Employee>();
    @Override
    protected void onCreate(Bundle savedInstanceState) {
        super.onCreate(savedInstanceState);
        setContentView(R.layout.activity_main);

        listView = findViewById(R.id.list);
        button = findViewById(R.id.showbtn);
        button.setOnClickListener(new View.OnClickListener() {
            @Override
            public void onClick(View v) {
                RequestQueue requestQueue = Volley.newRequestQueue(getApplicationContext());
String url = "https://api.myjson.com/bins/1b9qi3";
                JsonArrayRequest jsonArrayRequest = new JsonArrayRequest(Request.Method.GET, url, null, new Response.Listener<JSONArray>() {
                    @Override
                    public void onResponse(JSONArray response) {
                        for(int i = 0;i<response.length();i++){
                            try {
                                JSONObject jsonObject = response.getJSONObject(i);
                                String fstname = (String) jsonObject.get("FirstName");
                                String lstname = (String) jsonObject.get("LastName");
                               mylist.add(new Employee(fstname,lstname));

                            } catch (JSONException e) {
                                e.printStackTrace();
                            }

                        }

                        CustomAdapter  customAdapter = new CustomAdapter(MainActivity.this,mylist);
                        listView.setAdapter(customAdapter);
                    }
                }, new Response.ErrorListener() {
                    @Override
                    public void onErrorResponse(VolleyError error) {

                    }
                });
                    requestQueue.add(jsonArrayRequest);

            }
        });


    }
}

Android Volley Json Object Data Show To List View Using Array Adapter

  1. Step 1: Add Volley Library To App Level Module.app Gradle File Like Below Way
   implementation 'com.android.volley:volley:1.1.1'

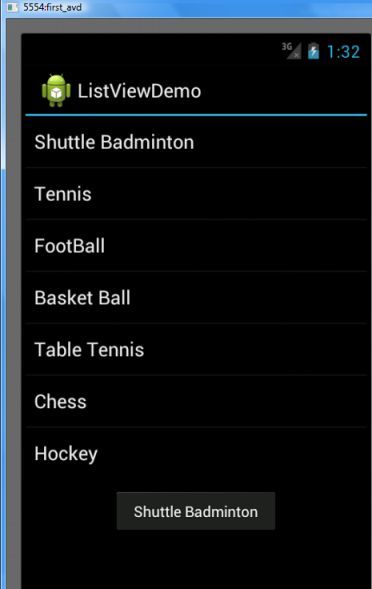
2. Step 2 : Add Internet Permission To Android Manifest File .

<uses-permission android:name="android.permission.INTERNET"></uses-permission>

3. Step 3. Add List View And A Data Show Button To Activity_main.xml File .

<?xml version="1.0" encoding="utf-8"?>
<LinearLayout xmlns:android="http://schemas.android.com/apk/res/android"
    xmlns:app="http://schemas.android.com/apk/res-auto"
    xmlns:tools="http://schemas.android.com/tools"
    android:layout_width="match_parent"
    android:layout_height="match_parent"
    android:orientation="vertical"
    tools:context=".MainActivity">
    <Button
        android:text="Show Data"
        android:id="@+id/showbtn"
        android:layout_width="match_parent"
        android:layout_height="wrap_content" />
<ListView
    android:id="@+id/list"
    android:layout_width="match_parent"
    android:layout_height="match_parent"></ListView>

</LinearLayout>

Step 4: In MainActivity.java File Find List View And Button And Set Onclicklisener To Button And Work Like Below Way.

package com.example.ppc.jsonarraycustomlistview;

import android.support.v7.app.AppCompatActivity;
import android.os.Bundle;
import android.view.View;
import android.widget.ArrayAdapter;
import android.widget.Button;
import android.widget.ListView;

import com.android.volley.Request;
import com.android.volley.RequestQueue;
import com.android.volley.Response;
import com.android.volley.VolleyError;
import com.android.volley.toolbox.JsonArrayRequest;
import com.android.volley.toolbox.JsonObjectRequest;
import com.android.volley.toolbox.JsonRequest;
import com.android.volley.toolbox.Volley;

import org.json.JSONArray;
import org.json.JSONException;
import org.json.JSONObject;

import java.util.ArrayList;

public class MainActivity extends AppCompatActivity {
private ListView listView;
private Button button;
private ArrayList<String> mylist = new ArrayList<String>();
    @Override
    protected void onCreate(Bundle savedInstanceState) {
        super.onCreate(savedInstanceState);
        setContentView(R.layout.activity_main);

        listView = findViewById(R.id.list);
        button = findViewById(R.id.showbtn);
        button.setOnClickListener(new View.OnClickListener() {
            @Override
            public void onClick(View v) {
                RequestQueue requestQueue = Volley.newRequestQueue(getApplicationContext());
String url = "https://api.myjson.com/bins/1b9qi3";
                JsonArrayRequest jsonArrayRequest = new JsonArrayRequest(Request.Method.GET, url, null, new Response.Listener<JSONArray>() {
                    @Override
                    public void onResponse(JSONArray response) {
                        for(int i = 0;i<response.length();i++){
                            try {
                                JSONObject jsonObject = response.getJSONObject(i);
                                String fstname = (String) jsonObject.get("FirstName");
                               mylist.add(fstname);

                            } catch (JSONException e) {
                                e.printStackTrace();
                            }

                        }

                        ArrayAdapter <String> adapter = new ArrayAdapter<String>(MainActivity.this,android.R.layout.simple_list_item_1,mylist);
                        listView.setAdapter(adapter);
                    }
                }, new Response.ErrorListener() {
                    @Override
                    public void onErrorResponse(VolleyError error) {

                    }
                });
                    requestQueue.add(jsonArrayRequest);

            }
        });


    }
}

My Json Data On Server Like this

[
  {
    "EmployeeID": 1,
    "LastName": "Davolio",
    "FirstName": "Nancy",
    "Address": "507 - 20th Ave. E. Apt. 2A",
    "City": "Seattle",
    "Region": "WA",
    "PostalCode": "98122",
    "Country": "USA",
    "HomePhone": "(206) 555-9857",
    "ResumeID": 1,
    "Resume": {
      "__deferred": {
        "uri": "/here/goes/your/serviceUrl/Employees(1)/Resume"
      }
    }
  },
  {
    "EmployeeID": 2,
    "LastName": "Fuller",
    "FirstName": "Andrew",
    "Address": "908 W. Capital Way",
    "City": "Tacoma",
    "Region": "WA",
    "PostalCode": "98401",
    "Country": "USA",
    "HomePhone": "(206) 555-9482",
    "ResumeID": 2,
    "Resume": {
      "__deferred": {
        "uri": "/here/goes/your/serviceUrl/Employees(2)/Resume"
      }
    }
  },
  {
    "EmployeeID": 3,
    "LastName": "Leverling",
    "FirstName": "Janet",
    "Address": "722 Moss Bay Blvd.",
    "City": "Kirkland",
    "Region": "WA",
    "PostalCode": "98033",
    "Country": "USA",
    "HomePhone": "(206) 555-3412",
    "ResumeID": 3,
    "Resume": {
      "__deferred": {
        "uri": "/here/goes/your/serviceUrl/Employees(3)/Resume"
      }
    }
  },
  {
    "EmployeeID": 4,
    "LastName": "Peacock",
    "FirstName": "Margaret",
    "Address": "4110 Old Redmond Rd.",
    "City": "Redmond",
    "Region": "WA",
    "PostalCode": "98052",
    "Country": "USA",
    "HomePhone": "(206) 555-8122",
    "ResumeID": 4,
    "Resume": {
      "__deferred": {
        "uri": "/here/goes/your/serviceUrl/Employees(4)/Resume"
      }
    }
  },
  {
    "EmployeeID": 5,
    "LastName": "Buchanan",
    "FirstName": "Steven",
    "Address": "14 Garrett Hill",
    "City": "London",
    "Region": null,
    "PostalCode": "SW1 8JR",
    "Country": "UK",
    "HomePhone": "(71) 555-4848",
    "ResumeID": 5,
    "Resume": {
      "__deferred": {
        "uri": "/here/goes/your/serviceUrl/Employees(5)/Resume"
      }
    }
  },
  {
    "EmployeeID": 6,
    "LastName": "Suyama",
    "FirstName": "Michael",
    "Address": "Coventry House Miner Rd.",
    "City": "London",
    "Region": null,
    "PostalCode": "EC2 7JR",
    "Country": "UK",
    "HomePhone": "(71) 555-7773",
    "ResumeID": 6,
    "Resume": {
      "__deferred": {
        "uri": "/here/goes/your/serviceUrl/Employees(6)/Resume"
      }
    }
  },
  {
    "EmployeeID": 7,
    "LastName": "King",
    "FirstName": "Robert",
    "Address": "Edgeham Hollow Winchester Way",
    "City": "London",
    "Region": null,
    "PostalCode": "RG1 9SP",
    "Country": "UK",
    "HomePhone": "(71) 555-5598",
    "ResumeID": 7,
    "Resume": {
      "__deferred": {
        "uri": "/here/goes/your/serviceUrl/Employees(7)/Resume"
      }
    }
  },
  {
    "EmployeeID": 8,
    "LastName": "Callahan",
    "FirstName": "Laura",
    "Address": "4726 - 11th Ave. N.E.",
    "City": "Seattle",
    "Region": "WA",
    "PostalCode": "98105",
    "Country": "USA",
    "HomePhone": "(206) 555-1189",
    "ResumeID": 8,
    "Resume": {
      "__deferred": {
        "uri": "/here/goes/your/serviceUrl/Employees(8)/Resume"
      }
    }
  },
  {
    "EmployeeID": 9,
    "LastName": "Dodsworth",
    "FirstName": "Anne",
    "Address": "7 Houndstooth Rd.",
    "City": "London",
    "Region": null,
    "PostalCode": "WG2 7LT",
    "Country": "UK",
    "HomePhone": "(71) 555-4444",
    "ResumeID": 9,
    "Resume": {
      "__deferred": {
        "uri": "/here/goes/your/serviceUrl/Employees(9)/Resume"
      }
    }
  }
]

Android Splash Screen

  1. Create A Activity Name Any Suppose SplashActivity And SplashActivity.java File Display A SplashActivity .xml File For 5 Second Or More Then Move To Mainactivity File By Android Intent Your SplashActivity.java IS Like This way.
public class SplashActivity extends Activity {

    Handler handler;
    @Override
    protected void onCreate(Bundle savedInstanceState) {
        super.onCreate(savedInstanceState);
        setContentView(R.layout.splashfile);

        handler=new Handler();
        handler.postDelayed(new Runnable() {
            @Override
            public void run() {
                Intent intent=new Intent(SplashActivity.this,MainActivity.class);
                startActivity(intent);
                finish();
            }
        },3000);

    }
}

2. Design Your Splashactivity.xml As Your Requirement .

3. Set SplashActivity As Luncher Activity . Like Below Way .

    <activity android:name="abhiandroid.com.splashscreen.SplashActivity">
        <intent-filter>
            <action android:name="android.intent.action.MAIN" />

            <category android:name="android.intent.category.LAUNCHER" />
        </intent-filter>
    </activity>
    <activity android:name="abhiandroid.com.splashscreen.MainActivity"/>

If You Don’t Know How To Set Luncher Activity Please See This Post . Set Specific Activity As Launcher Activity In Android Manifest File

Set Specific Activity As Launcher Activity In Android Manifest File

  1. Suppose You Have Two Activity For Example One Is Main Activity And Another IS ListFruitActivity Activity .
  2. By Default MainActivity Is Defult Luncher Activity Like Below Code In Android Manifest File .
<application
        android:icon="@drawable/ic_launcher"
        android:label="@string/app_name" >
        <activity
            android:label="List of Mobile OS"
            android:name=".ListMobileActivity" >
            <intent-filter >
                <action android:name="android.intent.action.MAIN" />
                <category android:name="android.intent.category.LAUNCHER" />
            </intent-filter>
        </activity>
        <activity
            android:label="List of Fruits"
            android:name=".ListFruitActivity" >
        </activity>
    </application>

If You Set ListFruitActivity As Launcher Activity You Can Change Your Code Like This Way .

    <application
        android:icon="@drawable/ic_launcher"
        android:label="@string/app_name" >
        <activity
            android:label="List of Mobile OS"
            android:name=".ListMobileActivity" >
        </activity>
        <activity
            android:label="List of Fruits"
            android:name=".ListFruitActivity" >
             <intent-filter >
                <action android:name="android.intent.action.MAIN" />
                <category android:name="android.intent.category.LAUNCHER" />
            </intent-filter>
        </activity>
    </application>

Explanation : Just Remove Intent Filter From MainActivity

         <intent-filter >
            <action android:name="android.intent.action.MAIN" />
            <category android:name="android.intent.category.LAUNCHER" />
        </intent-filter>

And Add Intent Filter To ListFruitActivity .

             <intent-filter >
                <action android:name="android.intent.action.MAIN" />
                <category android:name="android.intent.category.LAUNCHER" />
            </intent-filter>

Android Full Screen Mode And Hide Action Bar Programatiacally And Manually

     // Set fullscreen
        this.getWindow().setFlags(WindowManager.LayoutParams.FLAG_FULLSCREEN,
                WindowManager.LayoutParams.FLAG_FULLSCREEN);
 
        // Set No Title
        this.requestWindowFeature(Window.FEATURE_NO_TITLE);


Method 2 : One way is using Theme.Holo.Light.NoActionBar.Fullscreen value in AndroidManifest.xml file. (Use the appropriate theme name whichever you used in your application)


<activity android:name=".MainActivity"
    android:label="@string/app_name"
    android:theme="@android:style/Theme.Holo.Light.NoActionBar.Fullscreen">
</activity>

Android List View Populate With xml String Array

  1. Mainactivity.xml
<?xml version=”1.0” encoding=”utf-8”?>
<LinearLayout xmlns:android=”http://schemas.android.com/apk/res/android”
    android:layout_width=”fill_parent”
    android:layout_height=”fill_parent”
    android:orientation=”vertical” >
 
     <ListView
        android:id=”@+id/sportsList”
        android:layout_width=”match_parent”
        android:layout_height=”wrap_content” 
        android:entries="@array/sports_array"
    />
</LinearLayout>

Here @array/sports_array” Is Array Define In res/values/string.xml  . Open res/values/string.xml and replace it with following content.

<?xml version="1.0" encoding="utf-8"?>
<resources>
    <string name="hello">Hello World, ListViewActivity1!</string>
    <string name="app_name">ListViewDemo</string>
     <string-array name="sports_array">
        <item>Shuttle Badminton</item>
        <item>Tennis</item>
        <item>FootBall</item>
        <item>Basket Ball</item>
        <item>Table Tennis</item>
        <item>Chess</item>
        <item>Hockey</item>
    </string-array>
</resources>

3. To Set Onclick Listener You Can Modify Your MainActivity.java Like This WAy

public class ListViewActivity1 extends Activity implements OnItemClickListener{
    ListView listView;
     
    /** Called when the activity is first created. */
    @Override
    public void onCreate(Bundle savedInstanceState) {
        super.onCreate(savedInstanceState);
        setContentView(R.layout.main);
         
        listView = (ListView) findViewById(R.id.sportsList);
        listView.setOnItemClickListener(this);        
    }
 
    /*
     * Parameters:
        adapter - The AdapterView where the click happened.
        view - The view within the AdapterView that was clicked
        position - The position of the view in the adapter.
        id - The row id of the item that was clicked.
     */
    @Override
    public void onItemClick(AdapterView<?> adapter, View view, int position, long id) {
        Toast.makeText(getApplicationContext(), ((TextView) view).getText(),
                  Toast.LENGTH_SHORT).show();
    }
}
ListView Populate From String Array

Android Volley Json Array Data Show In Listview Using Arrayadapter

1.Add Volley Lirary to app build.gradle file.

    implementation 'com.android.volley:volley:1.1.1'

2.Add Internet Permission In Manifest File.

<uses-permission android:name="android.permission.INTERNET"></uses-permission>

3.Add Listview in activity.main.xml file .

<ListView
    android:id="@+id/list"
    android:layout_width="match_parent"
    android:layout_height="match_parent"></ListView>

4. Mainactivity.java File.

package com.example.myapplication;

import android.support.v7.app.AppCompatActivity;
import android.os.Bundle;
import android.widget.ArrayAdapter;
import android.widget.ListView;

import com.android.volley.Request;
import com.android.volley.RequestQueue;
import com.android.volley.Response;
import com.android.volley.VolleyError;
import com.android.volley.toolbox.JsonArrayRequest;
import com.android.volley.toolbox.Volley;

import org.json.JSONArray;
import org.json.JSONException;
import org.json.JSONObject;

import java.util.ArrayList;

public class MainActivity extends AppCompatActivity {
  private   ArrayList<String> list = new ArrayList<>();
private ListView listView;
    @Override
    protected void onCreate(Bundle savedInstanceState) {
        super.onCreate(savedInstanceState);
        setContentView(R.layout.activity_main);
        String url="https://api.myjson.com/bins/1a1a1f";
         listView = (ListView) findViewById(R.id.list);
        RequestQueue requestQueue = Volley.newRequestQueue(getApplicationContext());
        JsonArrayRequest jsonArrayRequest = new JsonArrayRequest(Request.Method.GET, url, null, new Response.Listener<JSONArray>() {
            @Override
            public void onResponse(JSONArray response) {
for (int i=0;i<response.length();i++){

    try {
        JSONObject jsonObject = response.getJSONObject(i);
        list.add(jsonObject.getString("name"));

    } catch (JSONException e) {
        e.printStackTrace();
    }
}

                ArrayAdapter <String> adapter = new ArrayAdapter<String>(MainActivity.this,android.R.layout.simple_list_item_1,list);
listView.setAdapter(adapter);
            }


        }, new Response.ErrorListener() {
            @Override
            public void onErrorResponse(VolleyError error) {
            }
        });

        requestQueue.add(jsonArrayRequest);
    }
}

Android Gridview With Custom Arrayadapter Image And Text

  1. File – res/layout/main.xml
<?xml version="1.0" encoding="utf-8"?>
<GridView xmlns:android="http://schemas.android.com/apk/res/android"
    android:id="@+id/gridView1"
    android:numColumns="auto_fit"
    android:gravity="center"
    android:columnWidth="100dp"
    android:stretchMode="columnWidth"
    android:layout_width="fill_parent"
    android:layout_height="fill_parent" >

</GridView>


2. File – res/layout/mobile.xml

<?xml version="1.0" encoding="utf-8"?>
<LinearLayout xmlns:android="http://schemas.android.com/apk/res/android"
    android:layout_width="wrap_content"
    android:layout_height="wrap_content"
    android:padding="5dp" >
 
    <ImageView
        android:id="@+id/grid_item_image"
        android:layout_width="50px"
        android:layout_height="50px"
        android:layout_marginRight="10px"
        android:src="@drawable/android_logo" >
    </ImageView>
 
    <TextView
        android:id="@+id/grid_item_label"
        android:layout_width="wrap_content"
        android:layout_height="wrap_content"
        android:text="@+id/label"
        android:layout_marginTop="5px"
        android:textSize="15px" >
    </TextView>
 
</LinearLayout>

2.2 Custom Adapter


package com.mkyong.android.adapter;

import android.content.Context;
import android.view.LayoutInflater;
import android.view.View;
import android.view.ViewGroup;
import android.widget.BaseAdapter;
import android.widget.ImageView;
import android.widget.TextView;

import com.mkyong.android.R;

public class ImageAdapter extends BaseAdapter {
	private Context context;
	private final String[] mobileValues;

	public ImageAdapter(Context context, String[] mobileValues) {
		this.context = context;
		this.mobileValues = mobileValues;
	}

	public View getView(int position, View convertView, ViewGroup parent) {

		LayoutInflater inflater = (LayoutInflater) context
			.getSystemService(Context.LAYOUT_INFLATER_SERVICE);

		View gridView;

		if (convertView == null) {

			gridView = new View(context);

			// get layout from mobile.xml
			gridView = inflater.inflate(R.layout.mobile, null);

			// set value into textview
			TextView textView = (TextView) gridView
					.findViewById(R.id.grid_item_label);
			textView.setText(mobileValues[position]);

			// set image based on selected text
			ImageView imageView = (ImageView) gridView
					.findViewById(R.id.grid_item_image);

			String mobile = mobileValues[position];

			if (mobile.equals("Windows")) {
				imageView.setImageResource(R.drawable.windows_logo);
			} else if (mobile.equals("iOS")) {
				imageView.setImageResource(R.drawable.ios_logo);
			} else if (mobile.equals("Blackberry")) {
				imageView.setImageResource(R.drawable.blackberry_logo);
			} else {
				imageView.setImageResource(R.drawable.android_logo);
			}

		} else {
			gridView = (View) convertView;
		}

		return gridView;
	}

	@Override
	public int getCount() {
		return mobileValues.length;
	}

	@Override
	public Object getItem(int position) {
		return null;
	}

	@Override
	public long getItemId(int position) {
		return 0;
	}

}

MainActivity.java

package com.mkyong.android;

import com.mkyong.android.adapter.ImageAdapter;
import android.app.Activity;
import android.os.Bundle;
import android.widget.AdapterView;
import android.widget.GridView;
import android.widget.TextView;
import android.widget.Toast;
import android.view.View;
import android.widget.AdapterView.OnItemClickListener;

public class GridViewActivity extends Activity {

	GridView gridView;

	static final String[] MOBILE_OS = new String[] { 
		"Android", "iOS","Windows", "Blackberry" };

	@Override
	public void onCreate(Bundle savedInstanceState) {

		super.onCreate(savedInstanceState);
		setContentView(R.layout.main);

		gridView = (GridView) findViewById(R.id.gridView1);

		gridView.setAdapter(new ImageAdapter(this, MOBILE_OS));

		gridView.setOnItemClickListener(new OnItemClickListener() {
			public void onItemClick(AdapterView<?> parent, View v,
					int position, long id) {
				Toast.makeText(
				   getApplicationContext(),
				   ((TextView) v.findViewById(R.id.grid_item_label))
				   .getText(), Toast.LENGTH_SHORT).show();

			}
		});

	}

}