Java Development Environment Setup With Eclips

  1. Download And Install Jdk. Jdk Link
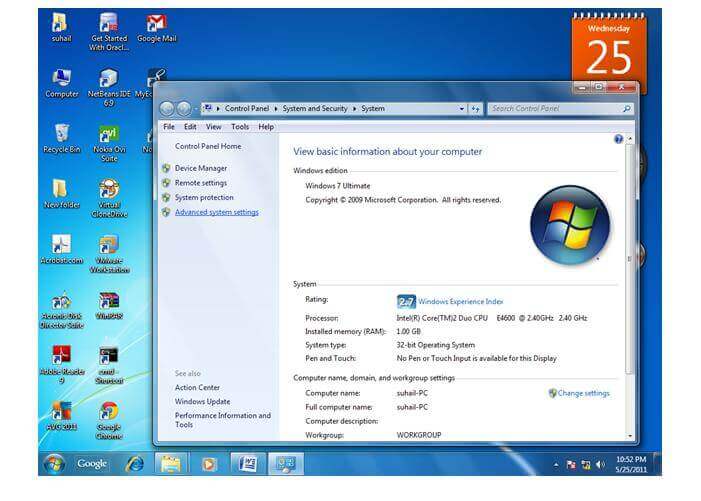
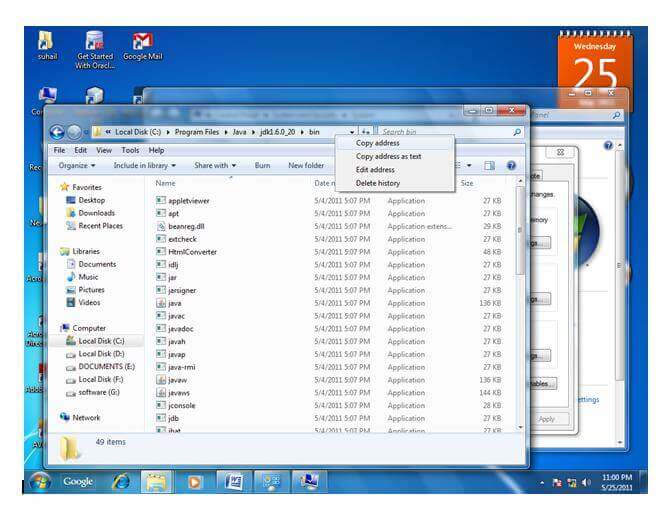
  2. Path Set For Java And Javac (Java Compiler ). If You Save Java Source File In Jdk/Bin Directory Then No Need Path Setup But If You Save Another Directory Then You Need To Path VAriable Set In This Way For Permanent Path .

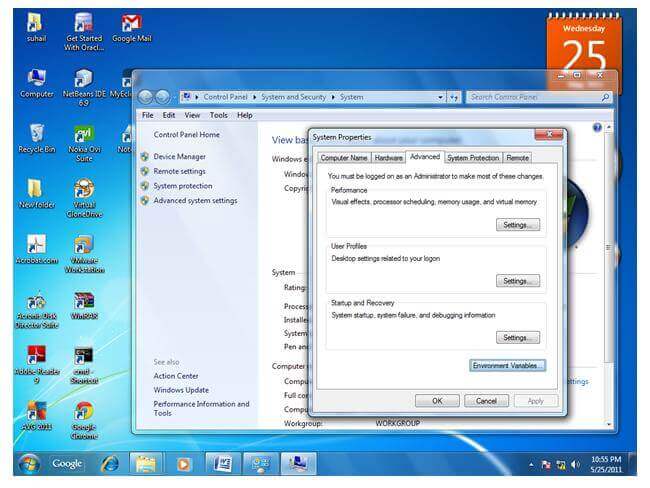
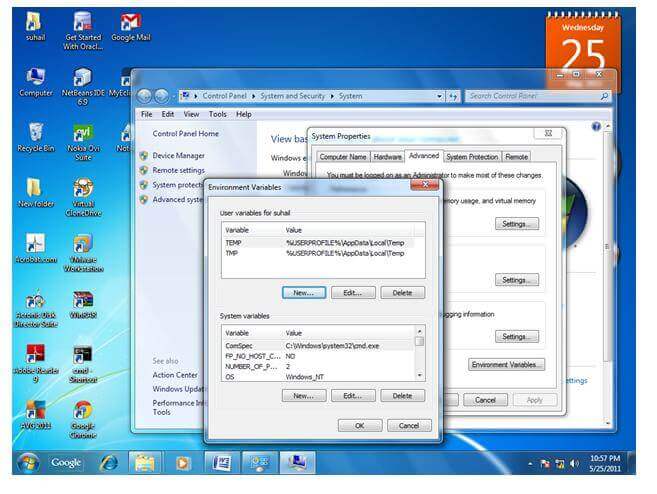
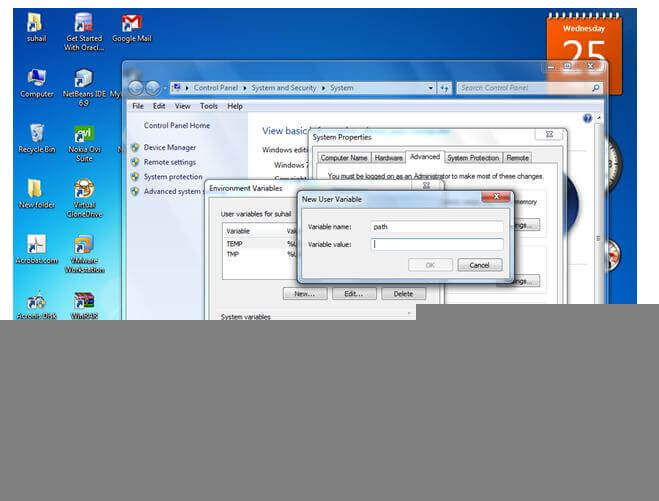
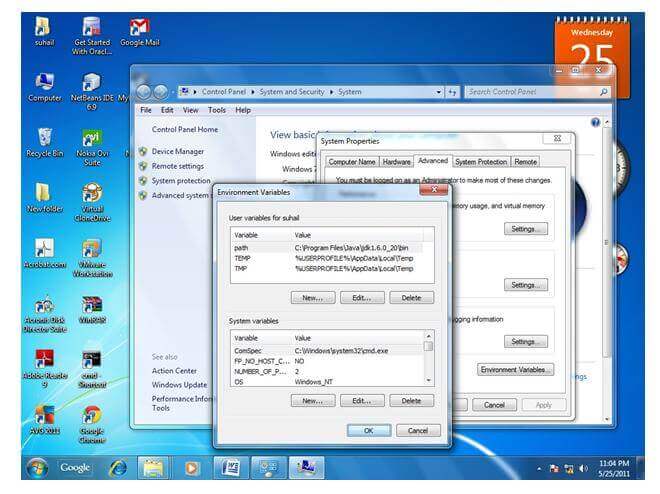
MyComputer properties -> advanced tab -> environment variables -> new tab of user variable -> write path in variable name -> write path of bin folder in variable value -> ok -> ok -> ok

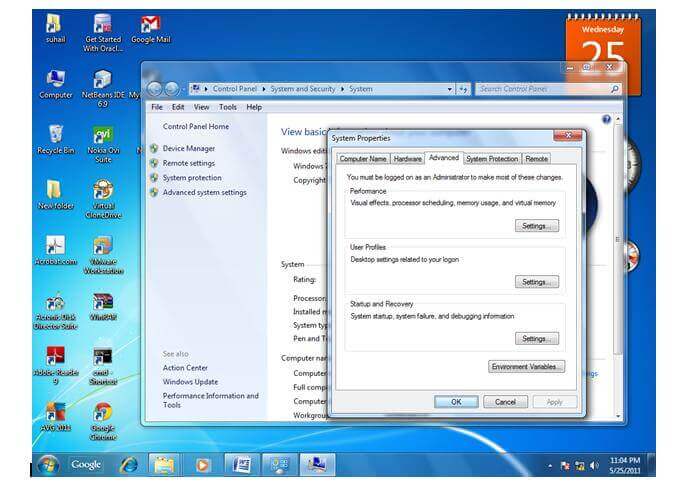
1) Go to MyComputer properties
2) Click on the advanced tab
3) Click on environment variables
4) Click on the new tab of user variables
5) Write the path in the variable name
6) Copy the path of bin folder
8) Click on ok button
9) Click on ok button

Now your permanent path is set. You can now execute any program of java from any drive.

1 Open Eclipse With Your Eclipse WorkSpace

2. File -> New -> Java Project ->Project Name (Example Name As Student )And Next And Finish

3. Create Java Class And Fill Source Folder Student/src. Package Name Your Choice Example student.name.And Class Name example Student.ok

4 Implement Main Method And Main Function For Output.


Android Sqlite Data Show To Custom Listview

Please Follow Previews Post To Insert Data Link

next step activityShowdata.xml

<?xml version="1.0" encoding="utf-8"?>
<LinearLayout xmlns:android="http://schemas.android.com/apk/res/android"
    xmlns:app="http://schemas.android.com/apk/res-auto"
    xmlns:tools="http://schemas.android.com/tools"
    android:layout_width="match_parent"
    android:orientation="vertical"
    android:layout_height="match_parent"
    tools:context=".Showdata">
<Button
    android:id="@+id/show"
    android:text="show"
    android:layout_width="match_parent"
    android:layout_height="wrap_content" />
<ListView
    android:id="@+id/list"
    android:layout_width="match_parent"
    android:layout_height="match_parent"></ListView>
</LinearLayout>

next step Showdata.java

package olee.tech.sqlitelistview;

import android.database.Cursor;
import android.database.sqlite.SQLiteDatabase;
import android.support.v7.app.AppCompatActivity;
import android.os.Bundle;
import android.widget.ListView;

import java.util.ArrayList;

public class Showdata extends AppCompatActivity {
    SQLiteDatabase database;
    Dbhelper dbhelper;
    Cursor cursor;
    DisplayAdapter displayAdapter;

    ArrayList<String> namelist;
    ArrayList<String> agelist;

    ListView listView;
    @Override
    protected void onCreate(Bundle savedInstanceState) {
        super.onCreate(savedInstanceState);
        setContentView(R.layout.activity_showdata);

        listView = findViewById(R.id.list);

        namelist = new ArrayList<>();
        agelist = new ArrayList<>();
        dbhelper = new Dbhelper(Showdata.this);
        database = dbhelper.getReadableDatabase();
        cursor = database.rawQuery("SELECT * FROM STUDENT",null);
        namelist.clear();
        agelist.clear();
        if (cursor.moveToFirst()){

            do {
                namelist.add(cursor.getString(cursor.getColumnIndex("name")));
                agelist.add(cursor.getString(cursor.getColumnIndex("age")));

            }

            while (cursor.moveToNext());

            DisplayAdapter displayAdapter = new DisplayAdapter(this,namelist,agelist);
            listView.setAdapter(displayAdapter);
            cursor.close();
        }


    }
}

next step mylist.xml

<?xml version="1.0" encoding="utf-8"?>
<LinearLayout
    xmlns:android="http://schemas.android.com/apk/res/android" android:layout_width="match_parent"
    android:orientation="horizontal"
    android:layout_height="match_parent">

    android:layout_height="wrap_content" />

<TextView
    android:padding="5dp"
    android:id="@+id/nametext"
    android:layout_width="wrap_content"
    android:layout_height="wrap_content" />
<TextView
    android:padding="5dp"
    android:id="@+id/agetext"
    android:layout_width="wrap_content"
    android:layout_height="wrap_content" />
</LinearLayout>

custom adapter

package olee.tech.sqlitelistview;


import android.content.Context;
import android.view.LayoutInflater;
import android.view.View;
import android.view.ViewGroup;
import android.widget.BaseAdapter;
import android.widget.TextView;

import java.util.ArrayList;

public class DisplayAdapter extends BaseAdapter {

Context context;
ArrayList<String> name;
ArrayList<String> age;

    public DisplayAdapter(Context context,  ArrayList<String> name, ArrayList<String> age) {
        this.context = context;
        this.name = name;
        this.age = age;
    }

    @Override
    public int getCount() {
        return name.size();
    }

    @Override
    public Object getItem(int position) {
        return null;
    }

    @Override
    public long getItemId(int position) {
        return 0;
    }

    @Override
    public View getView(int position, View convertView, ViewGroup parent) {
        LayoutInflater layoutInflater;
         layoutInflater = (LayoutInflater) context.getSystemService(Context.LAYOUT_INFLATER_SERVICE);
         View view = layoutInflater.inflate(R.layout.mylist,parent,false);
        TextView nametext = view.findViewById(R.id.nametext);
        TextView agetext = view.findViewById(R.id.agetext);
        nametext.setText(name.get(position));
        agetext.setText(age.get(position));
        return view;
    }
}

Android Button Design Example

1.drawable xml code

<?xml version="1.0" encoding="utf-8"?>
<selector xmlns:android="http://schemas.android.com/apk/res/android">
    <item>
        <shape>
            <gradient
                android:angle="360"
                android:startColor="#8A88F3"
                android:endColor="#B96AE8"
                android:type="linear" />
//for round
            <corners android:bottomLeftRadius="24dp"
                android:bottomRightRadius="24dp"
                android:topLeftRadius="24dp" android:topRightRadius="24dp" />
        </shape>
    </item>
</selector>
<Button
        android:id="@+id/btn_language_select_save"
        android:layout_width="wrap_content"
        android:layout_height="60dp"
        android:layout_centerInParent="true"
        android:layout_marginTop="20dp"
        android:background="@drawable/round_corner_spiner"
        android:paddingLeft="130dp"
        android:paddingRight="130dp"
        android:text="Vlad[enter image description here][1]"
        android:textColor="@android:color/white"
        android:textSize="20sp"
        android:visibility="visible" />

please see the link to generate android button link

Android Sqlite Save Data

  1. Create Database Handler
package com.example.sqlite;

import android.content.ContentValues;
import android.database.sqlite.SQLiteDatabase;
import android.database.sqlite.SQLiteOpenHelper;
import android.support.v7.app.AppCompatActivity;
import android.os.Bundle;
import android.text.TextUtils;
import android.view.View;
import android.widget.Button;
import android.widget.EditText;
import android.widget.Toast;

public class MainActivity extends AppCompatActivity {

    private SQLiteDatabase database;
    private Dbhandaler dbhandaler;

private EditText rolledittext,nameedittext;
private Button savebtn;

    @Override
    protected void onCreate(Bundle savedInstanceState) {
        super.onCreate(savedInstanceState);
        setContentView(R.layout.activity_main);
        rolledittext = findViewById(R.id.roll);
        nameedittext = findViewById(R.id.name);
        savebtn = findViewById(R.id.save);
        savebtn.setOnClickListener(new View.OnClickListener() {
            @Override
            public void onClick(View v) {
              Integer  roll = Integer.parseInt(rolledittext.getText().toString().trim()) ;
              String name = nameedittext.getText().toString().trim();

              if (TextUtils.isEmpty(rolledittext.getText().toString().trim() )){
                 rolledittext.setError("Please Fill Data");
              }
              else if (TextUtils.isEmpty(name)){
                  nameedittext.setError("Please Fill Data");
              }

                  try {
                      dbhandaler = new Dbhandaler(MainActivity.this);
                      database = dbhandaler.getWritableDatabase();
                      ContentValues contentValues = new ContentValues();
                      contentValues.put("roll", roll);
                      contentValues.put("name", name);
                      long result = database.insert("STUDENT", null, contentValues);
                      if (result == -1) {
                          return;
                      } else {

                          Toast.makeText(getApplicationContext(), "Data Inserted Successfull", Toast.LENGTH_SHORT).show();
                      }

                  } catch (Exception e) {


              }
            }
        });

    }
}

2. Create ui For Display Form

<?xml version="1.0" encoding="utf-8"?>
<LinearLayout xmlns:android="http://schemas.android.com/apk/res/android"
    xmlns:app="http://schemas.android.com/apk/res-auto"
    xmlns:tools="http://schemas.android.com/tools"
    android:layout_width="match_parent"
    android:layout_height="match_parent"
    android:orientation="vertical"
    tools:context=".MainActivity">

    <EditText
        android:id="@+id/roll"
        android:inputType="number"
        android:hint="Enter Roll Number"
        android:layout_width="match_parent"
        android:layout_height="wrap_content" />
    <EditText
        android:id="@+id/name"
        android:inputType="text"
        android:hint="Enter Roll Name"
        android:layout_width="match_parent"
        android:layout_height="wrap_content" />
<Button
    android:text="Save"
    android:id="@+id/save"
    android:layout_width="match_parent"
    android:layout_height="wrap_content" />
</LinearLayout>

3. Handle Save Opreation On MainActivity.java

package com.example.sqlite;

import android.content.ContentValues;
import android.database.sqlite.SQLiteDatabase;
import android.database.sqlite.SQLiteOpenHelper;
import android.support.v7.app.AppCompatActivity;
import android.os.Bundle;
import android.text.TextUtils;
import android.view.View;
import android.widget.Button;
import android.widget.EditText;
import android.widget.Toast;

public class MainActivity extends AppCompatActivity {

    private SQLiteDatabase database;
    private Dbhandaler dbhandaler;

private EditText rolledittext,nameedittext;
private Button savebtn;

    @Override
    protected void onCreate(Bundle savedInstanceState) {
        super.onCreate(savedInstanceState);
        setContentView(R.layout.activity_main);
        rolledittext = findViewById(R.id.roll);
        nameedittext = findViewById(R.id.name);
        savebtn = findViewById(R.id.save);
        savebtn.setOnClickListener(new View.OnClickListener() {
            @Override
            public void onClick(View v) {
              Integer  roll = Integer.parseInt(rolledittext.getText().toString().trim()) ;
              String name = nameedittext.getText().toString().trim();

              if (TextUtils.isEmpty(rolledittext.getText().toString().trim() )){
                 rolledittext.setError("Please Fill Data");
              }
              else if (TextUtils.isEmpty(name)){
                  nameedittext.setError("Please Fill Data");
              }
else {
                  try {
                      dbhandaler = new Dbhandaler(MainActivity.this);
                      database = dbhandaler.getWritableDatabase();
                      ContentValues contentValues = new ContentValues();
                      contentValues.put("roll", roll);
                      contentValues.put("name", name);
                      long result = database.insert("STUDENT", null, contentValues);
                      if (result == -1) {
                          return;
                      } else {

                          Toast.makeText(getApplicationContext(), "Data Inserted Successfull", Toast.LENGTH_SHORT).show();
                      }

                  } catch (Exception e) {

                  }
              }
            }
        });

    }
}

Android Firestore document data show on listview

  1. Connect Your Project with Firebase Firestore . follow link https://olee.tech.blog/2019/05/22/android-connect-with-firebase/
  2. Add Internet Permission.
<uses-permission android:name="android.permission.INTERNET" />

3.update activityshowlist.xml

<?xml version="1.0" encoding="utf-8"?>
<LinearLayout xmlns:android="http://schemas.android.com/apk/res/android"
    xmlns:app="http://schemas.android.com/apk/res-auto"
    xmlns:tools="http://schemas.android.com/tools"
    android:layout_width="match_parent"
    android:orientation="vertical"
    android:layout_height="match_parent"
    tools:context=".Showlist">


    <Button
        android:id="@+id/alldata"
        android:text="Alldata"
        android:layout_width="match_parent"
        android:layout_height="wrap_content" />

    <ListView
        android:id="@+id/list"
        android:layout_width="match_parent"
        android:layout_height="match_parent"></ListView>
</LinearLayout>

4.Update Showlist.java

package olee.tech.ngo;

import android.support.v7.app.AppCompatActivity;
import android.os.Bundle;
import android.view.View;
import android.widget.ArrayAdapter;
import android.widget.Button;
import android.widget.ListView;

import com.google.firebase.firestore.DocumentSnapshot;
import com.google.firebase.firestore.EventListener;
import com.google.firebase.firestore.FirebaseFirestore;
import com.google.firebase.firestore.FirebaseFirestoreException;
import com.google.firebase.firestore.QuerySnapshot;

import java.util.ArrayList;
import java.util.List;

import javax.annotation.Nullable;

public class Showlist extends AppCompatActivity {
private ListView list;
private Button alldata;
private List<String> mylist =new ArrayList<String>();
    @Override
    protected void onCreate(Bundle savedInstanceState) {
        super.onCreate(savedInstanceState);
        setContentView(R.layout.activity_showlist);

        list=findViewById(R.id.list);
        alldata=findViewById(R.id.alldata);
        final FirebaseFirestore db= FirebaseFirestore.getInstance();

        alldata.setOnClickListener(new View.OnClickListener() {
            @Override
            public void onClick(View v) {
            db.collection("users").addSnapshotListener(new EventListener<QuerySnapshot>() {
                @Override
                public void onEvent(@Nullable QuerySnapshot queryDocumentSnapshots, @Nullable FirebaseFirestoreException e) {
                    mylist.clear();
                    for (DocumentSnapshot documentSnapshot:queryDocumentSnapshots){
                        mylist.add(documentSnapshot.getString("name"));
                    }

                    ArrayAdapter arrayAdapter = new ArrayAdapter(getApplicationContext(),android.R.layout.simple_list_item_1,mylist);
                    list.setAdapter(arrayAdapter);

                }
            });

            }
        });
    }
}

Android FireStore single Docuent Crud

  1. Connect Your Project with Firebase Firestore . follow link https://olee.tech.blog/2019/05/22/android-connect-with-firebase/
  2. Add Internet Permission.
    <uses-permission android:name="android.permission.INTERNET" />
  1. Update activity.main.xml file
<?xml version="1.0" encoding="utf-8"?>
<LinearLayout xmlns:android="http://schemas.android.com/apk/res/android"
    xmlns:app="http://schemas.android.com/apk/res-auto"
    xmlns:tools="http://schemas.android.com/tools"
    android:layout_width="match_parent"
    android:orientation="vertical"
    android:layout_height="match_parent"
    tools:context=".MainActivity">

<EditText
    android:id="@+id/name"
    android:layout_width="match_parent"
    android:layout_height="wrap_content" />
    <TextView
        android:id="@+id/singledatatextview"
        android:layout_width="match_parent"
        android:layout_height="wrap_content" />
    <Button
        android:text="add"
        android:id="@+id/add"
        android:layout_width="match_parent"
        android:layout_height="wrap_content" />
    <Button
        android:id="@+id/showdata"
        android:text="Show Data"
        android:layout_width="match_parent"
        android:layout_height="wrap_content" />

    <Button
        android:id="@+id/update"
        android:text="Update Data"
        android:layout_width="match_parent"
        android:layout_height="wrap_content" />
    <Button
        android:id="@+id/delete"
        android:text="Delete"
        android:layout_width="match_parent"
        android:layout_height="wrap_content" />
    <Button
        android:id="@+id/alldata"
        android:text="alladata"
        android:layout_width="match_parent"
        android:layout_height="wrap_content" />
</LinearLayout>
  1. Update Mainactivity.java.
package olee.tech.ngo;

import android.content.Intent;
import android.support.annotation.NonNull;
import android.support.v7.app.AppCompatActivity;
import android.os.Bundle;
import android.text.TextUtils;
import android.view.View;
import android.widget.Button;
import android.widget.EditText;
import android.widget.TextView;
import android.widget.Toast;

import com.google.android.gms.tasks.OnCompleteListener;
import com.google.android.gms.tasks.OnFailureListener;
import com.google.android.gms.tasks.OnSuccessListener;
import com.google.android.gms.tasks.Task;
import com.google.firebase.firestore.DocumentReference;
import com.google.firebase.firestore.DocumentSnapshot;
import com.google.firebase.firestore.EventListener;
import com.google.firebase.firestore.FirebaseFirestore;
import com.google.firebase.firestore.FirebaseFirestoreException;
import com.google.firebase.firestore.QuerySnapshot;

import java.util.ArrayList;
import java.util.HashMap;
import java.util.List;
import java.util.Map;

import javax.annotation.Nullable;

public class MainActivity extends AppCompatActivity {
    private Map <String,Object> user = new HashMap<String, Object>();
    private EditText name,age;
    private TextView singledatatextview;
    private Button add,showdata,update,delete,alldata;

    // Define Database Class Variable;
    private FirebaseFirestore myDb;
    @Override
    protected void onCreate(Bundle savedInstanceState) {
        super.onCreate(savedInstanceState);
        setContentView(R.layout.activity_main);
        singledatatextview=findViewById(R.id.singledatatextview);
        name=findViewById(R.id.name);
        add=findViewById(R.id.add);
        update=findViewById(R.id.update);
        delete=findViewById(R.id.delete);
        alldata=findViewById(R.id.alldata);
        alldata.setOnClickListener(new View.OnClickListener() {
            @Override
            public void onClick(View v) {
                Intent intent = new Intent(MainActivity.this,Showlist.class);
                startActivity(intent);
            }
        });


        showdata=findViewById(R.id.showdata);
        myDb=FirebaseFirestore.getInstance();

        update.setOnClickListener(new View.OnClickListener() {
            @Override
            public void onClick(View v) {
                final String username=name.getText().toString().trim();
                if (!TextUtils.isEmpty(username)){
                    myDb.collection("users").document("cMmiI2O580raRoX34OGc").update("name",username).addOnSuccessListener(new OnSuccessListener<Void>() {
                        @Override
                        public void onSuccess(Void aVoid) {
                            name.setText("");
                            Toast.makeText(getApplicationContext(),"update successfull",Toast.LENGTH_SHORT).show();
                        }
                    }).addOnFailureListener(new OnFailureListener() {
                        @Override
                        public void onFailure(@NonNull Exception e) {

                        }
                    });

                }

            }
        });

        add.setOnClickListener(new View.OnClickListener() {
            @Override
            public void onClick(View v) {
                String username=name.getText().toString().trim();
                if (!TextUtils.isEmpty(username)){
                        user.put("name",username);

                    myDb.collection("users").document().set(user).addOnSuccessListener(new OnSuccessListener<Void>() {
                        @Override
                        public void onSuccess(Void aVoid) {
                            name.setText("");
                        }
                    }).addOnFailureListener(new OnFailureListener() {
                        @Override
                        public void onFailure(@NonNull Exception e) {

                        }
                    });
                }
                else {
                    name.setError("please Filled The Input");

                }


            }
        });


        showdata.setOnClickListener(new View.OnClickListener() {
            @Override
            public void onClick(View v) {
                DocumentReference documentReference = myDb.collection("users").document("cMmiI2O580raRoX34OGc");
                documentReference.get().addOnCompleteListener(new OnCompleteListener<DocumentSnapshot>() {
                    @Override
                    public void onComplete(@NonNull Task<DocumentSnapshot> task) {
                        if (task.isSuccessful()){
                            DocumentSnapshot documentSnapshot=task.getResult();
                            if (documentSnapshot.exists()){
                                StringBuilder stringBuilder = new StringBuilder("");
                                stringBuilder.append("name").append(documentSnapshot.get("name"));
                                singledatatextview.setText(stringBuilder.toString());
                            }
                        }
                    }
                }).addOnFailureListener(new OnFailureListener() {
                    @Override
                    public void onFailure(@NonNull Exception e) {

                    }
                });


            }
        });

        delete.setOnClickListener(new View.OnClickListener() {
            @Override
            public void onClick(View v) {
                DocumentReference documentReference= myDb.collection("users").document("cMmiI2O580raRoX34OGc");
                documentReference.delete().addOnSuccessListener(new OnSuccessListener<Void>() {
                    @Override
                    public void onSuccess(Void aVoid) {
                        Toast.makeText(getApplicationContext(),"delete Successfull",Toast.LENGTH_SHORT).show();

                    }
                }).addOnFailureListener(new OnFailureListener() {
                    @Override
                    public void onFailure(@NonNull Exception e) {

                    }
                });
            }
        });

            }

        }

Android Edit Text Validation

Email & Password Validation

emailEditText = (EditText) findViewById(R.id.editText_email);
passEditText = (EditText) findViewById(R.id.editText_password);

//Perform when need;
final String email = emailEditText.getText().toString();
if (!isValidEmail(email)) {emailEditText.setError("Invalid Email");}
final String pass = passEditText.getText().toString();
if (!isValidPassword(pass)) {passEditText.setError("Invalid Password");}

initilize method after oncreate block

	// validating email id
	private boolean isValidEmail(String email) {
		String EMAIL_PATTERN = "^[_A-Za-z0-9-\\+]+(\\.[_A-Za-z0-9-]+)*@"+ "[A-Za-z0-9-]+(\\.[A-Za-z0-9]+)*(\\.[A-Za-z]{2,})$";
		Pattern pattern = Pattern.compile(EMAIL_PATTERN);
		Matcher matcher = pattern.matcher(email);
		return matcher.matches();
	}

	// validating password with retype password
	private boolean isValidPassword(String pass) {
		if (pass != null && pass.length() > 6) {
			return true;
		}
		return false;
	}
Email & Password Validation

android-check-empty-edittext

  input = (EditText) findViewById(R.id.editText1);
 if(input.getText().toString().equals(""))
                     {
                            Toast.makeText(MainActivity.this, "Input Text Is Empty.. Please Enter Some Text", Toast.LENGTH_SHORT).show();
                     }
                     else
                     {
                          
                            Toast.makeText(MainActivity.this, "Input Text is Not Empty", Toast.LENGTH_SHORT).show();
                     }

GetEditText = edittext.getText().toString();
 
 if(TextUtils.isEmpty(GetEditText)){
 
 Toast.makeText(MainActivity.this, "EditText is Empty", Toast.LENGTH_LONG).show();
 
 }
 else {
 
 Toast.makeText(MainActivity.this, "EditText is Not Empty", Toast.LENGTH_LONG).show();
 
 }

Android Working with Recycler View

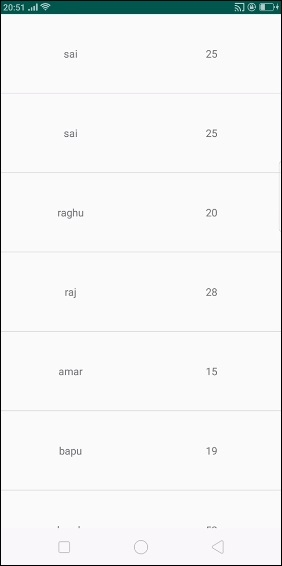
Recycler view is a more advanced version of listview and works based on View holder design pattern. Using recyclerview we can show grids as well as a list of items.

This example demonstrates how to integrate RecyclerView by creating a beautiful student records app that displays student name with age.

Step 1 − Create a new project in Android Studio, go to File ⇒ New Project and fill all required details to create a new project.

Step 2 − Open build.gradle and add Recycler view library dependency.

apply plugin: 'com.android.application'
android {
   compileSdkVersion 28
   defaultConfig {
      applicationId "com.example.andy.tutorialspoint"
      minSdkVersion 19
      targetSdkVersion 28
      versionCode 1
      versionName "1.0"
      testInstrumentationRunner "android.support.test.runner.AndroidJUnitRunner"
   }
   buildTypes {
      release {
         minifyEnabled false
         proguardFiles getDefaultProguardFile('proguard-android.txt'), 'proguard-rules.pro'
      }
   }
}
dependencies {
   implementation fileTree(dir: 'libs', include: ['*.jar'])
   implementation 'com.android.support:appcompat-v7:28.0.0'
   implementation 'com.android.support:design:28.0.0'
   implementation 'com.android.support.constraint:constraint-layout:1.1.3'
   implementation 'com.android.support:recyclerview-v7:28.0.0'
   testImplementation 'junit:junit:4.12'
   androidTestImplementation 'com.android.support.test:runner:1.0.2'
   androidTestImplementation 'com.android.support.test.espresso:espresso-core:3.0.2'
}

Step 3 − Add the following code to res/layout/activity_main.xml.

<?xml version="1.0" encoding="utf-8"?>
<RelativeLayout
   xmlns:android="http://schemas.android.com/apk/res/android"
   xmlns:tools="http://schemas.android.com/tools"
   xmlns:app="http://schemas.android.com/apk/res-auto"
   android:layout_width="match_parent"
   android:layout_height="match_parent"
   app:layout_behavior="@string/appbar_scrolling_view_behavior"
   tools:showIn="@layout/activity_main"
   tools:context=".MainActivity">
   <android.support.v7.widget.RecyclerView
      android:id="@+id/recycler_view"
      android:layout_width="match_parent"
      android:layout_height="wrap_content"
      android:scrollbars="vertical"
    />
</RelativeLayout>

In the above code, we have added recycler view to window manager as relative parent layout.

Step 4 − Add the following code to src/MainActivity.java

package com.example.andy.tutorialspoint;
import android.annotation.TargetApi;
import android.os.Build;
import android.os.Bundle;
import android.support.design.widget.TabLayout;
import android.support.v4.view.ViewPager;
import android.support.v7.app.AppCompatActivity;
import android.support.v7.widget.DividerItemDecoration;
import android.support.v7.widget.LinearLayoutManager;
import android.support.v7.widget.RecyclerView;
import android.support.v7.widget.Toolbar;
import java.util.ArrayList;
import java.util.List;
public class MainActivity extends AppCompatActivity {
   private RecyclerView recyclerView;
   private StudentAdapter studentAdapter;
   private List studentDataList =new ArrayList<>();
   @TargetApi(Build.VERSION_CODES.O)
   @Override
   protected void onCreate(Bundle savedInstanceState) {
      super.onCreate(savedInstanceState);
      setContentView(R.layout.activity_main);
      recyclerView = findViewById(R.id.recycler_view);
      studentAdapter=new StudentAdapter(studentDataList);
      RecyclerView.LayoutManager manager=new LinearLayoutManager(this);
      recyclerView.setLayoutManager(manager);
      recyclerView.addItemDecoration(new DividerItemDecoration(this, LinearLayoutManager.VERTICAL));
      recyclerView.setAdapter(studentAdapter);
      StudentDataPrepare();
   }
   private void StudentDataPrepare() {
      studentData data=new studentData("sai",25);
      studentDataList.add(data);
      data=new studentData("sai",25);
      studentDataList.add(data);
      data=new studentData("raghu",20);
      studentDataList.add(data);
      data=new studentData("raj",28);
      studentDataList.add(data);
      data=new studentData("amar",15);
      studentDataList.add(data);
      data=new studentData("bapu",19);
      studentDataList.add(data);
      data=new studentData("chandra",52);
      studentDataList.add(data);
      data=new studentData("deraj",30);
      studentDataList.add(data);
      data=new studentData("eshanth",28);
      studentDataList.add(data);
   }
}

In the above code, we have added a recycler view and studentAdapter. In that student adapter, we have passed studentDatalist as ArrayList. In Student, data list contains the name of the student and age.

Step 5 − Following is the content of the modified file src/ StudentAdapter.java.

package com.example.andy.tutorialspoint;
import android.support.annotation.NonNull;
import android.support.v7.widget.RecyclerView;
import android.view.LayoutInflater;
import android.view.View;
import android.view.ViewGroup;
import android.widget.TextView;
import java.util.List;
class StudentAdapter extends RecyclerView.Adapter {
   List studentDataList;
   public StudentAdapter(List studentDataList) {
      this.studentDataList=studentDataList;
   }
   @NonNull
   @Override
   public MyViewHolder onCreateViewHolder(@NonNull ViewGroup viewGroup, int i) {
      View itemView = LayoutInflater.from(viewGroup.getContext())
      .inflate(R.layout.student_list_row, viewGroup, false);
      return new MyViewHolder(itemView);
   }
   @Override
   public void onBindViewHolder(MyViewHolder viewHolder, int i) {
      studentData data=studentDataList.get(i);
      viewHolder.name.setText(data.name);
      viewHolder.age.setText(String.valueOf(data.age));
   }
   @Override
   public int getItemCount() {
      return studentDataList.size();
   }
   class MyViewHolder extends RecyclerView.ViewHolder {
      TextView name,age;
      public MyViewHolder(View itemView) {
         super(itemView);
         name=itemView.findViewById(R.id.name);
         age=itemView.findViewById(R.id.age);
      }
   }
}

In the adapter class, we have four methods as shown below –

onCreateViewHolder() – It is used to create a view holder and it returns a view.

onBindViewHolder() – it going to bind with created view holder.

getItemCount() – it contains size of list.

MyViewHolder class– it is view holder inner class which is extended by RecyclerView.ViewHolder

Step 6 − Following is the modified content of the xml res/layout/student_list_row.xml.

<?xml version="1.0" encoding="utf-8"?>
<LinearLayout xmlns:android="http://schemas.android.com/apk/res/android"
   android:orientation="horizontal" android:layout_width="match_parent"
   android:weightSum="1"
   android:layout_height="wrap_content">
<TextView
   android:id="@+id/name"
   android:layout_width="0dp"
   android:layout_weight="0.5"
   android:gravity="center"
   android:textSize="15sp"
   android:layout_height="100dp" />
   <TextView
      android:id="@+id/age"
      android:layout_width="0dp"
      android:layout_weight="0.5"
      android:gravity="center"
      android:textSize="15sp"
      android:layout_height="100dp" />
</LinearLayout>

In the above list item view, we have created two text views for name and age.

Step 7 − Following is the content of the modified file src/ studentData.java.

package com.example.andy.tutorialspoint;
class studentData {
   String name;
   int age;
   public studentData(String name, int age) {
      this.name=name;
      this.age=age;
   }
}

In the above code informs about student data object. Let’s try to run your application. I assume you have connected your actual Android Mobile device with your computer. To run the app from the android studio, open one of your project’s activity files and click Run  icon from the toolbar. Select your mobile device as an option and then check your mobile device which will display your default screen −

What is cloud computing? ক্লাউড কম্পিউটিং কি?

cloud computing Concept

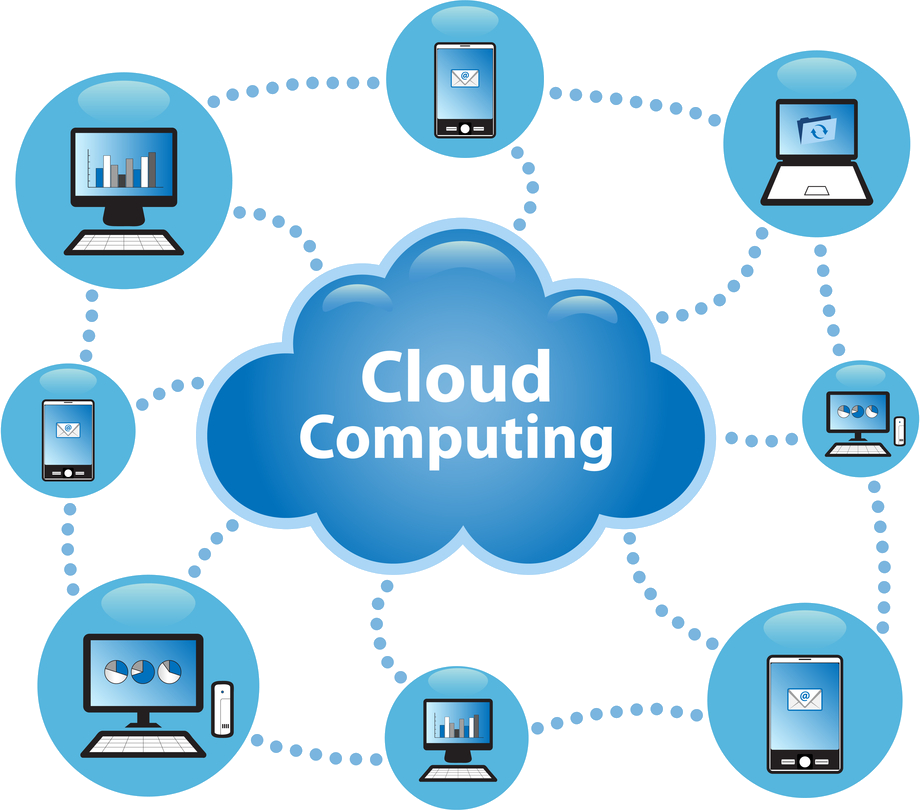
ক্লাউড কম্পিউটিং কি? ধরুন আপনার এখন ডাটা ভিজুয়ালাইজেশনের জন্য ম্যাটল্যাব সফটওয়্যাটি দরকার কিন্তু আপনার পিসিতে তা নেই । তাই আপনি ইন্টারনেটের মাধ্যমে কোন একটি সার্ভিস প্রভাইডারের কাছে ফ্রি অথবা অর্থের বিনিময়ে কানেক্ট হবেন যা আপনাকে ম্যাটল্যাব সফটওয়্যাটির ইনভাইরনমেন্ট দেবে ব্যবহারের জন্য ।

অথবা, আপনার ১৬/ ৩২ কোর প্রসেসরের প্রসেসিং পাওয়ার দরকার হতে পারে কোন বড় ক্যালকুলেশনের জন্য কিংবা মেশিন লার্নিং এর বড় কোন মডেল রান করার জন্য , যা আপনার / আমার মত গরিবের পক্ষে দিবাস্বপ্নের মত । কিন্তু সেই জন্য কি আমরা মেশিন লার্নিং শিখতে পারবো না ? অবশ্যই পারবো । আর এই জন্য আমরা ক্লাউড কম্পিউটিং এর মাধ্যমে (সাধারন পিসি থেকেই) কমমূল্য দিয়েই (হয়ত ঘন্টা হিসেবে) ঐ সার্ভিস পেতে পারি নেটওয়ার্কের মাধ্যেমে কানেক্টেড থেকে।

এটাই হলো ক্লাউড কম্পিউটিং। এটি একটি ভার্চুয়াল কম্পিউটার। অর্থাৎ কম্পিউটার এর যন্ত্রাংশ আপনি দেখতে পাবেন না কিন্তু যেকোনো স্থান থেকে এবং যেকোনো কম্পিউটিং ডিভাইজ থেকে একে রিমোট কন্ট্রোল এর মতো করে ব্যবহার করতে পারবেন। যেখানে আপনি ইচ্ছা মতো কনফিগারেশন করতে পারবেন এবং সকল উচ্চ মান এর কাজ করতে পারেন ইন্টারনেট সংযোগ এর মাধ্যমে। এখানে আপনি হাজার হাজার তথ্য সংরক্ষন করে রাখতে পারবেন। এমন সব কিছুই করতে পারবেন যা আপনার টেবিলে থাকা কম্পিউটার টি দিয়ে আপনি করেন। আপনার শুধু দরকার হবে একটি  ইন্টারনেট সংযোগ।

তাহলে এককথায় ক্লাউড কম্পিউটিং হলঃ কম্পিউটারের রিসোর্স গুলো মানে হার্ডওয়্যার এবং সফটওয়্যার এর সার্ভিস গুলো নেটওয়ার্ক এর মাধ্যমে প্রদান করা

ইউজার এর উপর ভিত্তি করে ক্লাউড কম্পিউটিং মূলত ৪ ধরনের হয়ে থাকেঃ

1. Public cloud: এক ধরনের ক্লাউড সার্ভিস যা সাধারন জনগন ব্যবহার করতে পারবে।
2. Private cloud: যেটা শুধু কোন নির্দিষ্ট প্রতিষ্ঠানের জনগন ব্যবহার করতে পারবে।
3. Hybrid cloud: এটা পাবলিক এবং প্রাইভেট দুইটার সংমিশ্রণে তৈরি।
4. Community cloud: এটা একাধিক প্রতিষ্ঠান ব্যবহার করতে পারবে।

সার্ভিসের উপর ভিত্তি করে ক্লাউড কম্পিউটিং কে তিন ভাগে ভাগ করা যেতে পারেঃ

1. IaaS (Infrastructure-as-a-Service): এতে অবকাঠামো বা Infrastructure ভাড়া দেয়া হয়। যেমন, কারো যদি একটা মেশিন লাগে তার কাজের জন্য তাহলে ভার্চুয়ালি সেই মেশিন ভাড়া দেয়া হয় কিংবা নেটওয়ার্কিং সেবা দেয়া হয়।
2. PaaS (Platform-as-a-Service): এতে প্লাটফর্ম ভাড়া দেয়া হয়। যেমনঃ অপারেটিং সিস্টেম, ডাটাবেজ কিংবা কোনো সার্ভার বা মনিটরিং সিস্টেম।
3. SaaS (Software-as-a-Service): এটা হচ্ছে ক্লাউডে চলা কোনো সফটওয়ার যেটা ইউজাররা ইন্টারনেটের মাধ্যমে সরাসরি ব্যবহার করতে পারেন তাদের মোবাইল ফোন কিংবা পিসির সাহায্যে। এদের এক কথায় ওয়েব সার্ভিস ও বলা যায়।

ক্লাউড কম্পিউটিং এর সুবিধাঃ

  • কম খরচঃ যেহেতু এতে আলাদা কোন সফটওয়্যার কেনার প্রয়োজন হয় না বা কোন হার্ডওয়্যার এর প্রয়োজন হয় না। তাই স্বাভাবিক ভাবে খরচ কম হবেই।
  • সহজে ব্যবহারঃ ক্লাউড কম্পিউটিং এর কাজ গুলো যেকোনো স্থানে বসেই মোবাইলের মাধ্যমে কন্ট্রোল করা যায় তাই এটা সহজে ব্যবহার যোগ্য।
  • সফটওয়্যার ব্যবহার: ক্লাউড কম্পিউটিং এর মাধ্যমে অনেক উচ্চমান সম্পূর্ণ কাজ করা সম্ভব। এবং প্রয়োজনীয় সকল সফটওয়্যার ব্যবহার করা সম্ভব যা হয়তো আপনাকে আলাদা টাকা দিয়ে কিনতে হতে পারত।
  • অটো সফটওয়্যার আপডেটঃ ক্লাউড কম্পিউটিং এর সফটওয়্যার গুলো আপনার আপডেট করার প্রয়োজন নেই। এগুলো অটো আপডেট হয়ে থাকে। তাই আলাদা ভাবে এটা মেইনটেন্স এর খরচ লাগে না।
  • যতটুকু ব্যবহার ততটুকু খরচঃ ক্লাউড কম্পিউটিং এ আপনি যত টুকু ব্যবহার করবেন শুধু মাত্র ততটুকুর জন্য পয়সা আপনাকে দিতে হবে। যেটা কিনা ডেস্কটপ কম্পিউটিং এ সম্ভব না।
  • ডকুমেন্ট কন্ট্রোলঃ মনে করুন কোন একটা অফিসে যদি ক্লাউড কম্পিউটিং না ব্যবহার করে তবে সেই অফিসের ডকুমেন্ট সমূহ কন্ট্রোল করতে বা এক স্থান থেকে অন্য স্থানে নেবার জন্য আলাদা লোকের প্রয়োজন হবে কিন্তু ক্লাউড কম্পিউটিং এ সেই ধরনের কোন সমস্যা নেই। অতিরিক্ত লোক ছারাই সকল ডকুমেন্ট কন্ট্রোল করা যায়।
  • ডাটা সংরক্ষন: একসাথে অনেক ডাটা সংরক্ষন করা সম্ভব। এবং সেই ডাটা কখনই হারিয়ে যাবে না বা নষ্ট হয়ে যাবে না। ক্লাউড কম্পিউটিং কোম্পানি গুলোর অনেক ডাটা সেন্টার থাকে। তাই আপনার ডাটা নিয়ে আপনাকে কনো চিন্তা করতে হবে না।
  •  সিকিউরঃ আপনার চেয়ে আপনার ডাটার সিকিউরিটি বেশি আপনি গুম হয়ে যাইতে পারেন যেকোনো মুহূর্তে কিন্তু আপনার ডাটা গুম হওয়ার ভয় নেই। আপনার যদি অনেক বেশি ডাটা থাকে আপনি হয়ত আলাদা হার্ডডিস্ক ব্যবহার করে ব্যাক আপ রাখলেন। কিন্তু সেই হার্ডডিস্ক যে ক্র্যাশ করবেনা সেই গ্যারান্টি নাই। আবার অন্য কোনোভাবেও আপনি ডাটা হারিয়ে ফেলতে পারেন। কিন্তু ক্লাউডে আপনার এই ভয় নেই। আপনার ডাটা রক্ষার গ্যারান্টি ক্লাউড আপনাকে দিবে। সুতরাং এই সুযোগে আপনি নিজের দিকে একটু বেশি খেয়াল রাখার সময় ও পাবেন। 

ক্লাউড কম্পিউটিং এর অসুবিধা:

১। আপনার তথ্য যদি ক্লাউডে রাখেন, তাহলে সেই তথ্যের গোপনীয়তা ভঙ্গের সম্ভাবনা থাকে। আপনার মহামুল্যবান তথ্য আরেক জনের হাতে তুলে দিচ্ছেন সে যে আপনার তথ্য নিয়ে গবেষণা করবে না তার কি গারান্টি আছে ? তবে সব কম্পনির ক্ষেত্রে এটা সঠিক নয়।
২। তথ্য করাপ্টেড হয়ে যেয়ে পারে নিমিষে।
৩। পর্যাপ্ত নিরাপত্তা নাও থাকতে পারে ।
৪। তথ্য ফাঁস হবার সম্ভাবনা।

ক্লাউড কম্পিউটিং এর কয়েকটি জনপ্রিয় অ্যাপ্লিকেশন এবং সার্ভিসঃ

Outright: হল একটি ফাইনান্স অ্যাপ্লিকেশন। এটা ছোট খাট বিজনেসের আকাউন্ট এর কাজে ব্যবহার করা হয়। বিজনেসের প্রফিট, লস, আয়, ব্যয় ইত্যাদির খরচ খুব সহজে করা যায়।
Google Apps; গুগল অ্যাপস অনেক সুবিধা দেয় যেমনঃ ডকুমেন্ট তরি করা, স্প্রেডশিড তৈরি, স্লাইড শো তৈরি, ক্যালেন্ডার মেইনটেন্স, পার্সোনাল ইমেইল ইত্যাদি তৈরি করার সুবিধা দেয়।
Evernote: প্রতিষ্ঠানের বিভিন্ন নোট সমূহ খুব সহজে কন্ট্রোল করা, ব্যবহার করা, যেকোনো স্থানে যেই নোট সমূহ ব্যবহার করাতে Evernote খুবই উপকারি।
Quickbooks; Quickbooks এক ধরনের একাউন্ট সার্ভিস। এর মাধ্যমে ক্যাশ নিয়ন্ত্রন করা, বাজেট তৈরি, বিজনেস রিপোর্ট তৈরি ইত্যাদির কাজে খুব ভাল সাপোর্ট দেয়।
Toggl; এটি একটি টাইম ট্র্যাকিং অ্যাপলিকেশন। মূলত প্রোজেক্ট কন্ট্রোল এবং টাইমিং এর জন্য এটা ব্যবহার করা হয়। প্রোজেক্ট তৈরিতে কত সময় লাগলো, কোন খাতে কতটুকু সময় সকল হিসাব এর মাধ্যমে জানা যায়।
Skype; Skype কম্পিউটার কে ফোনে রূপান্তর করে ফেলেছে। বিশ্বের যেকোনো স্থান থেকে কম্পিউটার এর মাধ্যমে কথা বলা, ভিডিও চ্যাট করা ইত্যাদির সুবিধা দিচ্ছে।
DropBox; অনেক দরকারি একটি সার্ভিস। ভার্চুয়াল হার্ডডিস্কও বলতে পারেন। মানে আপনি যেকোনো ধরনের ফাইল রাখতে পারবেন এবং সেটা যেকোনো পিসি থেকে কন্ট্রোল করতে পারবেন খুব সহজে। অন্যের সাথে শেয়ার করতে পারবেন।

Memory Load Website List

Youtube Channel For Bangla Movie

Bangla Music Video Modeling

Bangla Natok Youtube

Bangla Movie Youtube Channel

Telegu Movie Youtube

  • Ftp Server LiST

Torrent Website List

Tv Server Ftp

Bd FTP SERVER

http://103.82.8.194/Data/Indian%20Bangla/
http://103.87.212.46/Data
http://103.204.244.70/movies
http://103.49.168.107/movies/year/2021/
http://103.170.174.254/
http://103.133.175.242/80/
http://103.135.208.2/
http://103.109.56.115/ftpdata/disk7
http://103.199.155.150/ftpdata/disk11_bangla_1/bangla_1/2000-2020/
http://162.12.215.254/
http://103.85.160.7/
http://203.96.191.70/Data/disk2/Indian%20Bangla%20Movies/
http://khulnaplex.net/Data/ALLMovies/
https://www.mojaloss.stream/category/altbalaji/page/2/
https://elaach.com/movies/1027246950
http://movie.sambd.net:8096/web/index.html#!/home
http://aliflailabd.com/
http://ctgmovies.com/
http://crazyctg.com/
http://ihub.live/
http://vdomela.com/index.php
http://103.17.181.43/
http://cinemacity.live/
http://cinemacity.live:9090/Varot%20Bangla%20Movie/
http://timenai.com/
http://quickonlineftp.com/quickonline/movie/category/bangla
http://www.cinehub24.com/
https://ctgoz.com/